
Home Blog Page 19

SAUSAGE AND SPINACH SOUP

Sausage and Spinach Soup is a hearty, flavorful dish that’s perfect for a cozy dinner or lunch. The savory sausage pairs beautifully with the earthy spinach, while the broth is enriched with garlic, onions, and a touch of cream for a comforting and satisfying meal. It’s quick to prepare, making it ideal for a busy weeknight, and can easily be customized by adding other vegetables or beans. This soup is a warming, wholesome option that will leave you feeling nourished.

Ingredients:

  • 1 pound Italian sausage (mild or spicy, depending on preference)
  • 1 tablespoon olive oil (optional, if sausage is lean)
  • 1 onion, diced
  • 3 garlic cloves, minced
  • 2 large carrots, sliced
  • 2 celery stalks, sliced
  • 6 cups chicken broth
  • 1 (14.5-ounce) can diced tomatoes
  • 1 teaspoon dried oregano
  • 1 teaspoon dried thyme
  • Salt and pepper to taste
  • 4 cups fresh spinach (or 1 package frozen spinach, thawed and drained)
  • 1/2 cup heavy cream or half-and-half (optional)
  • Grated Parmesan cheese for serving (optional)

Instructions:

  1. Brown the sausage: In a large pot or Dutch oven, cook the sausage over medium heat until browned and cooked through, breaking it into small pieces as it cooks. If the sausage is lean, you may need to add a tablespoon of olive oil. Once browned, remove the sausage from the pot and set it aside.
  2. Sauté the vegetables: In the same pot, add the diced onion, carrots, and celery. Sauté for 5-7 minutes, until the vegetables are softened. Add the minced garlic and cook for another 1-2 minutes, until fragrant.
  3. Add the broth and tomatoes: Pour in the chicken broth and diced tomatoes, stirring to combine. Add the dried oregano, thyme, salt, and pepper. Bring the mixture to a boil.
  4. Simmer the soup: Once boiling, reduce the heat to low and let the soup simmer for 15-20 minutes, allowing the flavors to meld and the vegetables to cook through.
  5. Add the sausage and spinach: Stir the cooked sausage back into the pot, followed by the fresh spinach. Cook for another 2-3 minutes, until the spinach wilts. If using frozen spinach, make sure it’s thoroughly heated through.
  6. Finish with cream (optional): If you prefer a creamier soup, stir in the heavy cream or half-and-half at the end and heat until warmed through, but do not boil.
  7. Serve: Ladle the soup into bowls and top with grated Parmesan cheese if desired. Serve hot with crusty bread on the side for dipping.

This Sausage and Spinach Soup is a delicious, filling option that’s perfect for a cold day or when you need a quick, comforting meal!
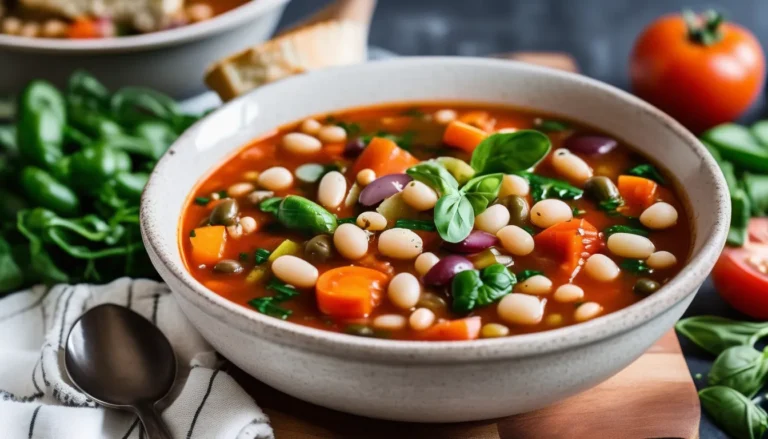
Italian Vegetable Soup

0

Italian Vegetable Soup is a comforting and hearty dish filled with a medley of fresh vegetables, beans, and aromatic herbs simmered in a rich tomato broth. This soup is not only flavorful but also incredibly nourishing, making it perfect for a light yet satisfying meal. It’s inspired by traditional Italian flavors, combining ingredients like zucchini, carrots, tomatoes, and cannellini beans with a hint of basil and oregano. Serve it with a slice of crusty Italian bread for a wholesome, cozy experience.

Ingredients:

  • 2 tablespoons olive oil
  • 1 medium onion, chopped
  • 2 garlic cloves, minced
  • 2 carrots, sliced
  • 2 celery stalks, chopped
  • 1 zucchini, diced
  • 1 yellow squash, diced
  • 1 can (15 oz) diced tomatoes
  • 4 cups vegetable broth
  • 1 can (15 oz) cannellini beans, drained and rinsed
  • 1 teaspoon dried basil
  • 1 teaspoon dried oregano
  • Salt and pepper to taste
  • 1 cup spinach or kale leaves
  • 1 tablespoon fresh parsley, chopped
  • Parmesan cheese for garnish (optional)

Instructions:

  1. In a large pot, heat olive oil over medium heat. Add the chopped onion and garlic, sautéing for about 2 minutes until fragrant.
  2. Add the carrots and celery, cooking for 5-6 minutes until softened.
  3. Stir in the zucchini and yellow squash, cooking for another 3 minutes.
  4. Pour in the diced tomatoes and vegetable broth, bringing the mixture to a simmer.
  5. Add the cannellini beans, dried basil, oregano, salt, and pepper. Simmer for 15 minutes to allow the flavors to meld together.
  6. Stir in the spinach or kale and cook for an additional 5 minutes until the greens are wilted.
  7. Remove from heat, sprinkle with fresh parsley, and garnish with Parmesan cheese if desired.
  8. Serve hot with crusty bread on the side.

Enjoy your delicious and hearty Italian Vegetable Soup!

Southwestern Potato Salad

0

This vibrant Southwestern Potato Salad is a zesty twist on the traditional version, bursting with bold flavors and fresh ingredients. The hearty potatoes are complemented by crunchy corn, black beans, and bell peppers, all tossed in a creamy, smoky dressing with a hint of spice. With a touch of lime, cilantro, and a kick of chili powder, this dish brings the flavors of the Southwest to your table. It’s perfect for summer barbecues, potlucks, or a flavorful side to any meal. Enjoy this salad warm or chilled for a versatile, delicious addition to your menu.

Ingredients:

  • 2 lbs potatoes, peeled and cubed
  • 1 cup canned black beans, drained and rinsed
  • 1 cup corn kernels (fresh, frozen, or canned)
  • 1 red bell pepper, diced
  • 1 green bell pepper, diced
  • 1/4 cup red onion, finely chopped
  • 1/4 cup fresh cilantro, chopped
  • 1/2 cup mayonnaise
  • 1/4 cup sour cream
  • 1 tablespoon lime juice
  • 1 teaspoon chili powder
  • 1/2 teaspoon smoked paprika
  • 1/2 teaspoon cumin
  • Salt and pepper to taste
  • Optional: diced jalapeño for heat

Instructions:

  1. Cook the Potatoes: In a large pot, bring salted water to a boil. Add the cubed potatoes and cook until tender, about 10-12 minutes. Drain and let them cool slightly.
  2. Prepare the Dressing: In a small bowl, whisk together the mayonnaise, sour cream, lime juice, chili powder, smoked paprika, cumin, salt, and pepper. Set aside.
  3. Assemble the Salad: In a large mixing bowl, combine the cooked potatoes, black beans, corn, red and green bell peppers, red onion, and cilantro. If you like a bit of spice, add the diced jalapeño.
  4. Toss the Salad: Pour the dressing over the salad ingredients and gently toss everything together until evenly coated.
  5. Chill or Serve: Serve the potato salad immediately for a warm dish, or chill it in the refrigerator for about an hour if you prefer it cold.

Enjoy your Southwestern Potato Salad with your favorite grilled meats or as a stand-alone dish!

Artichoke Crostini

0

Artichoke Crostini is an elegant and flavorful appetizer that’s perfect for entertaining or adding a touch of sophistication to any meal. These delightful bites feature a creamy, tangy artichoke spread served atop crispy, toasted slices of baguette. The combination of tender artichokes, rich cheese, and a hint of garlic creates a delicious topping that pairs beautifully with the crunchy crostini. Whether you’re hosting a dinner party or simply looking for a quick and tasty snack, Artichoke Crostini is a versatile and crowd-pleasing option that’s easy to prepare and sure to impress.

Ingredients:

  • 1 baguette, sliced into 1/2-inch thick rounds
  • 1 can (14 oz) artichoke hearts, drained and chopped
  • 1/2 cup grated Parmesan cheese
  • 1/4 cup mayonnaise
  • 2 cloves garlic, minced
  • 1 tablespoon fresh lemon juice
  • 1/2 teaspoon lemon zest
  • 1/4 teaspoon black pepper
  • 2 tablespoons olive oil
  • Fresh parsley, chopped (for garnish)

Instructions:

  1. Prepare the Crostini: Preheat your oven to 375°F (190°C). Arrange the baguette slices on a baking sheet. Brush each slice lightly with olive oil. Bake in the preheated oven for 8-10 minutes, or until golden brown and crispy. Remove from the oven and set aside.
  2. Make the Artichoke Topping: In a medium mixing bowl, combine the chopped artichoke hearts, grated Parmesan cheese, mayonnaise, minced garlic, lemon juice, lemon zest, and black pepper. Stir until well mixed and creamy.
  3. Assemble the Crostini: Spoon a generous amount of the artichoke mixture onto each toasted baguette slice, spreading it evenly.
  4. Bake: Place the topped crostini back in the oven and bake for an additional 5-7 minutes, or until the topping is heated through and slightly golden.
  5. Garnish and Serve: Remove the crostini from the oven and transfer to a serving platter. Garnish with chopped fresh parsley and serve warm.

Artichoke Crostini is a delightful and easy-to-make appetizer that combines creamy, tangy flavors with the satisfying crunch of toasted bread, making it an ideal choice for any occasion.

Bacon Cheddar Deviled Eggs

0

Bacon Cheddar Deviled Eggs are a savory and indulgent twist on the classic deviled egg recipe. These delightful bites combine the creamy richness of traditional deviled eggs with the smoky flavor of crispy bacon and the sharp tang of cheddar cheese. Perfect for parties, picnics, or any gathering, these deviled eggs are sure to be a hit with guests. The combination of flavors and textures—creamy yolks, crunchy bacon, and smooth cheese—makes each bite irresistible. Whether you’re looking for a crowd-pleasing appetizer or a tasty snack, Bacon Cheddar Deviled Eggs are a delicious and easy-to-make option.

Ingredients:

  • 6 large eggs
  • 3 tablespoons mayonnaise
  • 1 teaspoon Dijon mustard
  • 1/4 teaspoon garlic powder
  • Salt and pepper, to taste
  • 1/4 cup sharp cheddar cheese, finely shredded
  • 3 slices bacon, cooked until crispy and crumbled
  • 1 tablespoon fresh chives, chopped (optional, for garnish)
  • Paprika (optional, for garnish)

Instructions:

  1. Boil the Eggs: Place the eggs in a single layer in a saucepan and cover them with water. Bring to a boil over medium-high heat. Once the water reaches a boil, cover the saucepan, remove it from the heat, and let the eggs sit for 12 minutes.
  2. Cool and Peel the Eggs: Drain the hot water and transfer the eggs to a bowl of ice water to cool for about 5 minutes. Once cooled, peel the eggs and slice them in half lengthwise.
  3. Prepare the Filling: Gently remove the yolks from the egg halves and place them in a mixing bowl. Mash the yolks with a fork until smooth. Add the mayonnaise, Dijon mustard, garlic powder, salt, and pepper, and mix until creamy and well combined.
  4. Add the Bacon and Cheese: Stir in the shredded cheddar cheese and crumbled bacon, reserving a small amount of bacon for garnish if desired.
  5. Fill the Egg Whites: Spoon or pipe the yolk mixture back into the egg white halves, filling each generously.
  6. Garnish and Serve: Garnish the deviled eggs with the reserved bacon crumbles, chopped fresh chives, and a sprinkle of paprika if desired. Serve immediately or refrigerate until ready to serve.

Bacon Cheddar Deviled Eggs are a tasty and satisfying appetizer that adds a savory, cheesy twist to a beloved classic, making them perfect for any occasion.

Raspberry Pancakes

0

Raspberry Pancakes are a deliciously fruity twist on classic pancakes, offering a burst of tangy sweetness in every bite. These fluffy pancakes are made even more delightful by the addition of fresh or frozen raspberries, which add a pop of color and flavor that pairs perfectly with a drizzle of maple syrup or a dusting of powdered sugar. Perfect for a weekend brunch or a special breakfast treat, Raspberry Pancakes are easy to whip up and sure to bring a smile to your face. Their light and airy texture, combined with the juicy raspberries, make them a refreshing and satisfying way to start your day.

Ingredients:

  • 1 1/2 cups all-purpose flour
  • 2 tablespoons granulated sugar
  • 1 teaspoon baking powder
  • 1/2 teaspoon baking soda
  • 1/4 teaspoon salt
  • 1 cup buttermilk (or milk with 1 tablespoon lemon juice)
  • 1/2 cup milk
  • 1 large egg
  • 2 tablespoons unsalted butter, melted
  • 1 teaspoon vanilla extract
  • 1 cup fresh or frozen raspberries
  • Butter or oil for cooking
  • Maple syrup, powdered sugar, or whipped cream (for serving)

Instructions:

  1. Prepare the Batter: In a large mixing bowl, whisk together the flour, sugar, baking powder, baking soda, and salt. In a separate bowl, whisk together the buttermilk, milk, egg, melted butter, and vanilla extract until well combined.
  2. Combine Wet and Dry Ingredients: Pour the wet ingredients into the dry ingredients and stir until just combined. Be careful not to overmix; the batter should be slightly lumpy. Gently fold in the raspberries, taking care not to break them up too much.
  3. Heat the Griddle or Pan: Heat a non-stick griddle or large skillet over medium heat. Lightly grease with butter or oil.
  4. Cook the Pancakes: Pour about 1/4 cup of batter onto the griddle for each pancake. Cook until bubbles form on the surface and the edges look set, about 2-3 minutes. Flip the pancakes and cook for another 1-2 minutes, until golden brown and cooked through.
  5. Serve: Serve the Raspberry Pancakes warm, topped with your choice of maple syrup, powdered sugar, whipped cream, or additional raspberries.

These Raspberry Pancakes are a perfect way to elevate your breakfast with their light, fluffy texture and bursts of juicy raspberry flavor, making them a delightful treat for any morning.

Cheese Blintzes

0

Cheese blintzes are a delightful Eastern European treat, perfect for breakfast or dessert. They consist of delicate crepes wrapped around a creamy, slightly sweet cheese filling and are lightly pan-fried until golden and crisp. Often served with fruit compote or a dusting of powdered sugar, these tender parcels offer a beautiful balance between the rich cheese and the thin, light crepe. Whether you’re enjoying them for a special brunch or a sweet end to your meal, cheese blintzes are a satisfying comfort food that can be enjoyed any time of the day.

Ingredients:

For the crepes:

  • 1 cup all-purpose flour
  • 2 large eggs
  • 1 cup milk
  • 1/4 cup water
  • 2 tbsp melted butter
  • 1 tbsp sugar
  • Pinch of salt
  • Butter or oil for frying

For the cheese filling:

  • 1 cup ricotta cheese or farmer’s cheese
  • 4 oz cream cheese, softened
  • 1/4 cup sugar
  • 1 large egg yolk
  • 1 tsp vanilla extract
  • Zest of 1 lemon (optional)

Instructions:

  1. Prepare the crepes:
    In a large mixing bowl, whisk together the flour, eggs, milk, water, melted butter, sugar, and salt until smooth. The batter should be thin and pourable. Let it rest for 15 minutes to allow the flour to fully hydrate.
  2. Cook the crepes:
    Heat a non-stick skillet or crepe pan over medium heat and lightly grease it with butter or oil. Pour about 1/4 cup of the batter into the pan, swirling it to evenly coat the bottom. Cook for about 1-2 minutes until the edges begin to lift and the bottom is lightly golden. Flip and cook for another 30 seconds. Transfer to a plate and repeat with the remaining batter.
  3. Make the cheese filling:
    In a medium bowl, combine the ricotta or farmer’s cheese, cream cheese, sugar, egg yolk, vanilla extract, and lemon zest. Mix until smooth and well combined.
  4. Assemble the blintzes:
    Lay a crepe on a flat surface. Spoon about 2 tablespoons of the cheese filling into the center of the crepe. Fold the sides over the filling, then fold the top and bottom edges in to create a neat package.
  5. Fry the blintzes:
    In a large skillet, heat a tablespoon of butter or oil over medium heat. Place the filled blintzes seam-side down in the skillet and cook for 2-3 minutes on each side, until golden and crispy.
  6. Serve:
    Serve the cheese blintzes warm, topped with powdered sugar, fruit compote, or a drizzle of honey. Enjoy!

These can also be frozen before the frying step and reheated when ready to serve.

Seafood Enchiladas

0

Seafood Enchiladas are a luxurious and flavorful twist on the traditional enchilada, featuring tender shrimp, crab, or a mix of your favorite seafood, all wrapped in soft tortillas and smothered in a creamy, zesty sauce. This dish combines the fresh, delicate flavors of the sea with the rich warmth of Mexican spices, making it a perfect choice for a special dinner or when you want to impress your guests. The creamy sauce, often made with sour cream, cheese, and green chilies, adds a velvety texture that complements the seafood beautifully. Baked until bubbly and golden, these enchiladas are a delightful and indulgent meal that brings the taste of the ocean to your table.

Ingredients:

  • 1 lb shrimp, peeled, deveined, and chopped
  • 1/2 lb lump crab meat
  • 1 tablespoon olive oil
  • 1 small onion, finely chopped
  • 2 cloves garlic, minced
  • 1 teaspoon ground cumin
  • 1 teaspoon chili powder
  • 1/2 teaspoon paprika
  • Salt and pepper, to taste
  • 8 small flour tortillas
  • 1 1/2 cups shredded Monterey Jack or cheddar cheese
  • 1 cup sour cream
  • 1 can (4 oz) diced green chilies
  • 1/2 cup heavy cream or half-and-half
  • 1/4 cup fresh cilantro, chopped (for garnish)
  • Lime wedges (for serving)

Instructions:

  1. Preheat the Oven: Preheat your oven to 350°F (175°C). Lightly grease a 9×13-inch baking dish.
  2. Cook the Seafood: In a large skillet, heat the olive oil over medium heat. Add the chopped onion and sauté until softened, about 5 minutes. Add the minced garlic and cook for another minute. Stir in the shrimp, cumin, chili powder, paprika, salt, and pepper. Cook the shrimp until just pink and opaque, about 3-4 minutes. Remove the skillet from heat and gently fold in the crab meat. Set aside.
  3. Prepare the Sauce: In a medium mixing bowl, combine the sour cream, diced green chilies, and heavy cream. Stir in 1 cup of the shredded cheese, reserving the rest for topping the enchiladas.
  4. Assemble the Enchiladas: Spoon a generous amount of the seafood mixture down the center of each tortilla. Roll up the tortillas and place them seam-side down in the prepared baking dish. Pour the sour cream sauce evenly over the top of the enchiladas.
  5. Bake: Sprinkle the remaining shredded cheese over the enchiladas. Bake in the preheated oven for 20-25 minutes, or until the cheese is melted and bubbly and the enchiladas are heated through.
  6. Garnish and Serve: Remove the enchiladas from the oven and garnish with freshly chopped cilantro. Serve hot with lime wedges on the side.

These Seafood Enchiladas are a delightful combination of fresh seafood, creamy sauce, and warm tortillas, making them an indulgent yet easy-to-prepare dish that’s sure to impress.

Maple Mustard Glazed Chicken

0

This Maple Mustard Glazed Chicken is the perfect balance of sweet and tangy, making it a delightful dish for any occasion. The richness of maple syrup pairs beautifully with the sharpness of Dijon mustard, creating a glaze that caramelizes perfectly over juicy chicken breasts or thighs. With a hint of garlic and the savory addition of herbs, this recipe delivers complex flavors with minimal effort. Serve it alongside roasted vegetables or a fresh salad for a complete and satisfying meal that’s sure to become a family favorite.

Ingredients:

  • 4 boneless, skinless chicken breasts (or thighs)
  • 1/3 cup pure maple syrup
  • 1/4 cup Dijon mustard
  • 2 tablespoons olive oil
  • 2 garlic cloves, minced
  • 1 tablespoon apple cider vinegar
  • 1 teaspoon dried thyme (or fresh thyme)
  • Salt and pepper, to taste
  • Fresh parsley, for garnish (optional)

Instructions:

  1. Preheat the oven: Preheat your oven to 400°F (200°C).
  2. Prepare the glaze: In a small bowl, whisk together the maple syrup, Dijon mustard, olive oil, minced garlic, apple cider vinegar, thyme, salt, and pepper until smooth.
  3. Coat the chicken: Place the chicken breasts or thighs in a baking dish. Pour the maple mustard glaze over the chicken, ensuring each piece is evenly coated.
  4. Bake: Bake the chicken in the preheated oven for 25-30 minutes, or until the chicken is cooked through (internal temperature reaches 165°F) and the glaze has caramelized, basting the chicken with the glaze halfway through.
  5. Garnish and serve: Once cooked, remove the chicken from the oven. Let it rest for 5 minutes before serving. Garnish with fresh parsley, if desired.

Serve this Maple Mustard Glazed Chicken with your favorite sides, such as roasted potatoes, steamed vegetables, or a crisp green salad. Enjoy!

CILANTRO LIME CAULIFLOWER RICE

Cilantro Lime Cauliflower Rice is a light, refreshing, and low-carb alternative to traditional rice, infused with the bright flavors of fresh lime juice and cilantro. This dish is perfect as a side for tacos, burrito bowls, grilled meats, or even as a base for a healthy meal. It’s quick to prepare and packs a punch of flavor, making it a great option for those looking to add more vegetables to their diet while keeping things flavorful and satisfying.

Ingredients:

  • 1 medium head of cauliflower, grated (or 4 cups pre-riced cauliflower)
  • 1 tablespoon olive oil
  • 2 garlic cloves, minced
  • Juice of 1 lime
  • Zest of 1 lime
  • Salt and pepper, to taste
  • 1/4 cup fresh cilantro, chopped

Instructions:

  1. Prepare the cauliflower: If you’re using a whole head of cauliflower, cut it into florets and pulse them in a food processor until they resemble rice grains. You can also grate the cauliflower using a box grater. If using pre-riced cauliflower, skip this step.
  2. Sauté the garlic: In a large skillet, heat the olive oil over medium heat. Add the minced garlic and sauté for about 1 minute, until fragrant, being careful not to let it burn.
  3. Cook the cauliflower rice: Add the riced cauliflower to the skillet and stir to combine with the garlic. Cook for 5-7 minutes, stirring occasionally, until the cauliflower is tender but not mushy.
  4. Add lime and cilantro: Remove the skillet from the heat and stir in the lime juice, lime zest, and chopped cilantro. Season with salt and pepper to taste.
  5. Serve: Serve the cilantro lime cauliflower rice as a side dish or use it as a base for burrito bowls, tacos, or alongside your favorite protein.

This Cilantro Lime Cauliflower Rice is fresh, zesty, and light, making it a great addition to any meal. It’s a healthy, flavorful swap for traditional rice that will leave you feeling full and satisfied!