Home Blog Page 32

Aquafaba Chocolate Mousse

0

Aquafaba chocolate mousse is a light, airy, and completely vegan dessert that uses the magic of aquafaba (the liquid from canned chickpeas) to create a silky, decadent mousse without any eggs or dairy. This dessert is perfect for those looking for a healthier alternative while still indulging in rich chocolate flavors. The aquafaba, when whipped, takes on a meringue-like texture, creating the fluffy base for this chocolate mousse. Whether you’re serving this at a dinner party or enjoying it as a treat at home, it’s bound to impress with its creamy yet light texture and deep chocolate taste.

Ingredients:

  • 1 cup aquafaba (liquid from a can of chickpeas)
  • 1/4 teaspoon cream of tartar
  • 1/2 teaspoon vanilla extract (optional)
  • 1 cup dark chocolate, chopped (vegan if needed)
  • 2 tablespoons maple syrup or sugar (optional, depending on the sweetness of the chocolate)
  • Pinch of salt

Instructions:

  1. Prepare the Chocolate: Melt the dark chocolate in a heatproof bowl over a pot of simmering water (double boiler) or in the microwave in 30-second intervals, stirring in between until fully melted. Let the melted chocolate cool slightly while you prepare the aquafaba.
  2. Whip the Aquafaba: Pour the aquafaba into a large mixing bowl. Add the cream of tartar and a pinch of salt. Using a hand mixer or a stand mixer, whip the aquafaba on high speed for 8-10 minutes until it reaches stiff peaks, much like whipped egg whites. The aquafaba should be thick, glossy, and hold its shape well.
  3. Sweeten (Optional): If you’re using a sweeter chocolate or prefer less sweetness, skip this step. Otherwise, slowly add in the maple syrup or sugar while whipping to combine it into the mousse.
  4. Combine Chocolate and Aquafaba: Slowly pour the melted chocolate into the whipped aquafaba while gently folding it in with a spatula. Be careful not to deflate the mixture. Continue folding until the chocolate is fully incorporated and the mousse is a uniform color.
  5. Chill: Transfer the mousse into individual serving dishes or one large bowl. Let it chill in the refrigerator for at least 2 hours to set.
  6. Serve: Garnish with shaved chocolate, fresh berries, or a dollop of coconut whipped cream, if desired. Enjoy!


Chocolate Chili

0

Chocolate in chili may sound unusual, but this rich and savory combination has deep roots in Mexican cuisine. The addition of unsweetened cocoa or dark chocolate to chili adds a subtle depth and warmth that elevates the dish to a whole new level. This hearty, slightly spicy, and complex chili has a robust flavor, with a touch of bitterness from the chocolate that balances out the heat from the spices. Perfect for a chilly evening or a casual gathering, this chocolate chili is a comforting dish that will surprise and satisfy anyone who tries it.

Ingredients:

  • 2 tablespoons olive oil
  • 1 large onion, chopped
  • 4 garlic cloves, minced
  • 1 lb ground beef or turkey (optional)
  • 1 can (15 oz) kidney beans, drained and rinsed
  • 1 can (15 oz) black beans, drained and rinsed
  • 1 can (15 oz) diced tomatoes
  • 1 can (6 oz) tomato paste
  • 1 cup beef or vegetable broth
  • 2 tablespoons chili powder
  • 1 tablespoon cumin
  • 1 tablespoon smoked paprika
  • 1/2 teaspoon cayenne pepper (optional)
  • 1/2 teaspoon cinnamon
  • 2 tablespoons unsweetened cocoa powder or 1 oz dark chocolate (70% or higher)
  • Salt and pepper to taste
  • Optional toppings: sour cream, shredded cheese, chopped cilantro, avocado slices

Instructions:

  1. Sauté the vegetables: In a large pot, heat the olive oil over medium heat. Add the chopped onion and sauté until soft, about 5 minutes. Stir in the minced garlic and cook for another minute until fragrant.
  2. Brown the meat (if using): Add the ground beef or turkey to the pot, breaking it up with a spoon, and cook until browned, about 7-8 minutes. Drain any excess fat.
  3. Add the spices: Stir in the chili powder, cumin, smoked paprika, cayenne pepper, and cinnamon, coating the meat and vegetables with the spices.
  4. Add beans and tomatoes: Pour in the diced tomatoes, tomato paste, beans, and broth. Stir everything together until well mixed.
  5. Simmer the chili: Reduce the heat to low, cover, and let the chili simmer for about 20-30 minutes, stirring occasionally to prevent sticking.
  6. Add the chocolate: In the last 5 minutes of cooking, stir in the unsweetened cocoa powder or dark chocolate. Let it melt and blend into the chili for a deep, rich flavor.
  7. Season to taste: Taste the chili and adjust the seasoning with salt and pepper as needed.
  8. Serve and garnish: Serve hot, topped with your favorite toppings like sour cream, shredded cheese, chopped cilantro, or avocado slices.

Enjoy this hearty and unique chocolate chili, perfect for warming up on a cold day!

Butternut Squash Steaks

0

Butternut squash steaks are a fantastic, hearty vegetarian option that can easily hold their own as the star of any meal. These “steaks” are thick slices of butternut squash, roasted or grilled to perfection, with a caramelized exterior and tender interior. They offer a wonderful balance of natural sweetness and earthy flavors. When topped with fresh herbs, a drizzle of balsamic glaze, or even some toasted nuts, they become a visually stunning and delicious centerpiece. Perfect for an elegant dinner or as a side dish that’s full of fall flavors.

Ingredients:

  • 1 large butternut squash
  • 2 tablespoons olive oil
  • 1 teaspoon garlic powder
  • 1 teaspoon smoked paprika
  • Salt and pepper, to taste
  • Fresh thyme or rosemary (optional)
  • Balsamic glaze (optional, for serving)
  • Toasted pine nuts or pecans (optional)

Instructions:

  1. Preheat the oven to 400°F (200°C) or heat a grill to medium-high.
  2. Prepare the squash: Peel the butternut squash and cut off the top and bottom. Slice the squash lengthwise and remove the seeds. Cut each half into thick, 1-inch slabs (about 2-3 “steaks” per half).
  3. Season the steaks: In a small bowl, mix together the olive oil, garlic powder, smoked paprika, salt, and pepper. Brush each side of the butternut squash steaks with the seasoned oil mixture.
  4. Roast or grill:
    • For roasting: Place the squash steaks on a parchment-lined baking sheet and roast for 25-30 minutes, flipping halfway through, until the squash is golden and tender.
    • For grilling: Place the squash steaks directly on the grill and cook for about 5-6 minutes per side, until grill marks appear and the steaks are tender.
  5. Garnish and serve: Sprinkle with fresh thyme or rosemary, if using. Drizzle with balsamic glaze and top with toasted pine nuts or pecans for an extra burst of flavor.

Serve hot as a main or side dish, alongside your favorite grain or salad.

Mango Pie

0

Mango pie is a tropical twist on a classic fruit pie that brings the sweet, juicy flavors of ripe mangoes into a buttery, flaky crust. With its vibrant color and natural sweetness, this pie is perfect for warm weather gatherings, family dinners, or when you’re simply craving a taste of the tropics. The smooth mango filling, accented with a hint of lime juice and a touch of cinnamon, balances beautifully with the crisp crust. Serve it with a scoop of vanilla ice cream or a dollop of whipped cream for a refreshing and delightful dessert experience.

Ingredients:

  • 2 cups fresh mango, diced (about 2-3 ripe mangoes)
  • 1 tablespoon lime juice
  • 3/4 cup granulated sugar
  • 2 tablespoons cornstarch
  • 1/4 teaspoon cinnamon
  • 1/4 teaspoon salt
  • 1 tablespoon butter, cubed
  • 1 pre-made pie crust (or homemade, for top and bottom)
  • 1 egg, beaten (for egg wash)

Instructions:

  1. Prepare the mango filling: In a large bowl, combine diced mango, lime juice, sugar, cornstarch, cinnamon, and salt. Toss gently to coat the mango evenly. Let the mixture sit for 10 minutes to allow the mangoes to release their juices and for the sugar to dissolve.
  2. Prepare the pie crust: Preheat your oven to 375°F (190°C). Roll out the bottom crust and fit it into a 9-inch pie dish. Trim any excess dough hanging over the edges.
  3. Fill the pie: Pour the mango mixture into the prepared pie crust, spreading it evenly. Dot the top of the filling with small cubes of butter.
  4. Top the pie: Roll out the second pie crust and place it over the mango filling. Trim the edges and crimp the edges to seal. Cut small slits in the top of the crust to allow steam to escape. Brush the top crust with beaten egg to give it a golden sheen.
  5. Bake the pie: Place the pie on the middle rack of the oven and bake for 45-50 minutes, or until the crust is golden brown and the filling is bubbling.
  6. Cool and serve: Allow the pie to cool for at least 2 hours before slicing, giving the filling time to set. Serve with whipped cream or ice cream for extra indulgence.

Enjoy this deliciously tropical treat!

Apple Bars

0

These Apple Bars are a delightful treat perfect for autumn or any time you crave the comforting flavors of cinnamon-spiced apples. With a tender, buttery crust and a luscious apple filling, they’re topped with a crumbly streusel that adds the perfect amount of crunch. The balance of sweet and tart apples, combined with a hint of vanilla and cinnamon, makes these bars irresistible. They’re easy to make and ideal for sharing at gatherings or enjoying with a cup of coffee or tea.

Ingredients:

  • For the crust:
    • 2 cups all-purpose flour
    • 1/2 cup powdered sugar
    • 1 cup unsalted butter, cold and cubed
  • For the apple filling:
    • 5 cups peeled, cored, and thinly sliced apples (Granny Smith or Honeycrisp work well)
    • 1/2 cup granulated sugar
    • 1 tablespoon all-purpose flour
    • 1 teaspoon ground cinnamon
    • 1/4 teaspoon ground nutmeg
    • 1 teaspoon vanilla extract
    • Juice of half a lemon
  • For the streusel topping:
    • 1 cup all-purpose flour
    • 1/2 cup packed brown sugar
    • 1/2 cup unsalted butter, melted
    • 1/2 teaspoon ground cinnamon
    • 1/4 teaspoon salt

Instructions:

  1. Prepare the crust:
    Preheat your oven to 350°F (175°C). Line a 9×13-inch baking pan with parchment paper or lightly grease it. In a medium bowl, combine the flour and powdered sugar. Cut in the cold butter using a pastry blender or two forks until the mixture resembles coarse crumbs. Press the mixture evenly into the prepared baking pan to form the crust. Bake for 15-20 minutes or until lightly golden.
  2. Make the apple filling:
    In a large bowl, combine the sliced apples, sugar, flour, cinnamon, nutmeg, vanilla extract, and lemon juice. Toss until the apples are evenly coated. Set aside.
  3. Prepare the streusel topping:
    In a small bowl, whisk together the flour, brown sugar, cinnamon, and salt. Pour in the melted butter and stir until the mixture forms a crumbly texture.
  4. Assemble the bars:
    Once the crust is done baking, spread the apple filling evenly over the top. Sprinkle the streusel topping over the apples, covering them as evenly as possible.
  5. Bake:
    Return the pan to the oven and bake for 40-45 minutes, or until the apples are tender and the topping is golden brown.
  6. Cool and serve:
    Allow the apple bars to cool completely in the pan before cutting them into squares. Enjoy them on their own, or serve with a dollop of whipped cream or a scoop of vanilla ice cream for an extra indulgent treat.

Wild Mushroom Beef Stew

0

This rich and hearty Wild Mushroom Beef Stew is perfect for cold days when you need something warm and comforting. Combining tender chunks of beef, a medley of wild mushrooms, and aromatic vegetables, this stew brings together rustic flavors with an earthy twist. The slow cooking process allows the meat to become melt-in-your-mouth tender, while the mushrooms infuse a deep, umami richness into the broth. Serve it with crusty bread to soak up every last bit of this deliciously savory stew.

Ingredients:

  • 2 lbs beef stew meat, cut into 1-inch cubes
  • 1 cup wild mushrooms (such as porcini, shiitake, or chanterelles), cleaned and sliced
  • 1 onion, diced
  • 2 carrots, peeled and chopped
  • 2 celery stalks, chopped
  • 4 garlic cloves, minced
  • 1/4 cup tomato paste
  • 1/4 cup red wine
  • 4 cups beef broth
  • 2 sprigs fresh thyme
  • 2 bay leaves
  • 1 tsp dried rosemary
  • Salt and pepper, to taste
  • 3 tbsp olive oil
  • 1/4 cup all-purpose flour (optional, for thickening)
  • Fresh parsley, chopped (for garnish)

Instructions:

  1. Heat 2 tablespoons of olive oil in a large pot or Dutch oven over medium heat. Season the beef with salt and pepper, then brown the meat in batches until all sides are seared. Remove the beef from the pot and set aside.
  2. In the same pot, add the remaining tablespoon of olive oil. Sauté the onions, carrots, celery, and garlic until softened, about 5 minutes.
  3. Add the tomato paste and cook for another 2 minutes, stirring frequently.
  4. Deglaze the pot by adding the red wine, scraping up any browned bits from the bottom of the pot.
  5. Stir in the wild mushrooms and cook for 3-4 minutes until they release their moisture.
  6. Return the beef to the pot and add the beef broth, thyme, bay leaves, and rosemary. Bring to a boil, then reduce the heat to low, cover, and let the stew simmer for 1.5 to 2 hours, or until the beef is tender.
  7. If you prefer a thicker stew, in the last 10 minutes of cooking, whisk the flour with some of the stew liquid and stir it back into the pot.
  8. Once the stew is ready, remove the bay leaves and thyme sprigs. Adjust seasoning with salt and pepper if needed.
  9. Garnish with fresh parsley before serving.

Enjoy this robust Wild Mushroom Beef Stew with a side of crusty bread for a full, satisfying meal!

Green Bean Casserole

0

Green Bean Casserole is a classic comfort dish that has graced many holiday tables for generations. Its simple yet satisfying blend of tender green beans, creamy mushroom sauce, and crispy fried onions creates a rich, savory flavor that everyone loves. Whether you’re making it for Thanksgiving, Christmas, or just a family dinner, this recipe is easy to prepare and delivers a warm, nostalgic taste that’s hard to resist. The best part is that you can make it with fresh, frozen, or canned green beans, making it adaptable for any kitchen!

Ingredients:

  • 4 cups fresh green beans, trimmed and cut into 1-inch pieces (or use frozen or canned)
  • 1 can (10.5 oz) condensed cream of mushroom soup
  • 1/2 cup milk
  • 1 tsp soy sauce (optional, for extra flavor)
  • 1/4 tsp ground black pepper
  • 1 1/3 cups French-fried onions, divided
  • 1 cup shredded cheddar cheese (optional)

Instructions:

  1. Preheat the oven to 350°F (175°C).
  2. Cook the green beans: If using fresh green beans, bring a large pot of salted water to a boil. Add the green beans and cook for 5-7 minutes until tender-crisp. Drain and set aside. If using frozen or canned beans, skip this step and drain them if necessary.
  3. Make the casserole sauce: In a large bowl, combine the cream of mushroom soup, milk, soy sauce (if using), and black pepper. Stir until smooth.
  4. Assemble the casserole: Add the cooked or drained green beans to the sauce mixture and stir to coat. Add 2/3 cup of the fried onions and mix well.
  5. Bake: Transfer the green bean mixture to a 9×13-inch baking dish. Spread it out evenly, and if you’re using shredded cheddar cheese, sprinkle it on top. Bake in the preheated oven for 25 minutes.
  6. Add the topping: After 25 minutes, remove the casserole from the oven and sprinkle the remaining fried onions over the top. Return the dish to the oven and bake for an additional 5 minutes, or until the onions are golden and crispy.
  7. Serve: Allow the casserole to rest for a few minutes before serving.

Enjoy your delicious, crispy-topped Green Bean Casserole!

Peppermint Truffles

0

These delightful peppermint truffles are the perfect holiday treat, combining the rich, smooth texture of chocolate with the refreshing coolness of peppermint. Whether you’re looking for a simple yet elegant dessert or a festive gift for friends and family, these truffles are sure to impress. With just a handful of ingredients, they’re surprisingly easy to make, and you can even customize them by adding extra decorations like sprinkles or crushed candy canes for a truly festive touch. Each bite offers a balance of creamy chocolate and a hint of mint, making them an irresistible indulgence.

Ingredients:

  • 1 cup heavy cream
  • 12 oz semi-sweet or dark chocolate, finely chopped
  • 1 tsp peppermint extract
  • 1/4 cup unsalted butter, cut into small pieces
  • 1/4 cup crushed peppermint candies (optional)
  • Cocoa powder, for rolling (or crushed candy canes for extra crunch)

Instructions:

  1. Heat the Cream: In a small saucepan, bring the heavy cream to a gentle simmer over medium heat. Remove from heat as soon as it starts to bubble around the edges.
  2. Melt the Chocolate: Place the chopped chocolate in a heatproof bowl. Pour the hot cream over the chocolate and let it sit for 1-2 minutes to allow the chocolate to soften.
  3. Stir in the Butter and Peppermint: Gently stir the mixture until the chocolate is completely melted and smooth. Add the butter and peppermint extract, stirring until fully incorporated.
  4. Chill the Mixture: Cover the bowl and place it in the refrigerator for about 2 hours, or until the chocolate mixture is firm enough to scoop.
  5. Shape the Truffles: Using a small cookie scoop or a spoon, scoop out portions of the chilled chocolate and roll them into 1-inch balls between your hands.
  6. Coat the Truffles: Roll the truffles in cocoa powder or crushed peppermint candies for a festive look.
  7. Serve or Store: Place the truffles on a lined baking sheet and refrigerate for at least 30 minutes before serving. Store them in an airtight container in the refrigerator for up to 2 weeks.

Enjoy these decadent peppermint truffles as a special treat during the holiday season!

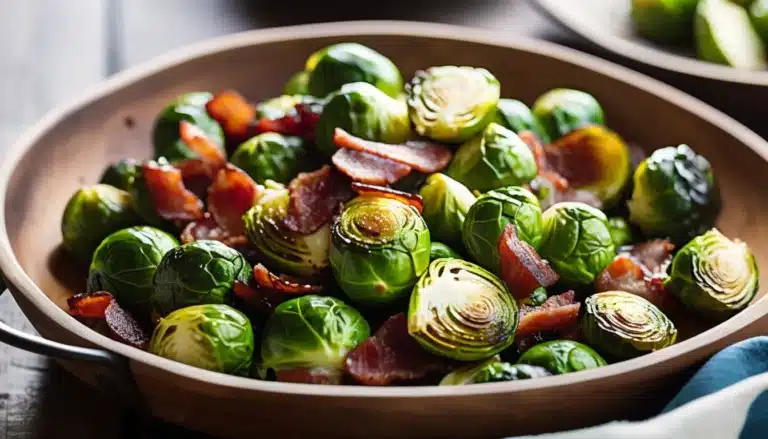
Roasted Brussels Sprouts With Bacon

0

This easy and flavorful dish brings together the rich, smoky taste of bacon with the crisp, caramelized texture of roasted Brussels sprouts. The combination of savory bacon and tender, slightly sweet Brussels sprouts creates a delicious side dish perfect for any meal, from weeknight dinners to holiday gatherings. With a hint of garlic and a touch of balsamic vinegar to elevate the flavors, this recipe adds a touch of sophistication to a humble vegetable. Plus, it’s quick to prepare and bakes in just 25 minutes, making it a go-to for busy nights or special occasions.

Ingredients:

  • 1 lb Brussels sprouts, trimmed and halved
  • 4 slices of bacon, chopped
  • 2 tbsp olive oil
  • 2 cloves garlic, minced
  • 1 tbsp balsamic vinegar
  • Salt and pepper to taste

Instructions:

  1. Preheat your oven to 400°F (200°C).
  2. Spread the halved Brussels sprouts on a large baking sheet. Drizzle with olive oil and season with salt and pepper.
  3. Add the chopped bacon evenly over the Brussels sprouts.
  4. Roast in the preheated oven for 20-25 minutes, stirring halfway through, until the Brussels sprouts are tender and golden brown, and the bacon is crispy.
  5. In the last 5 minutes of roasting, sprinkle the minced garlic over the Brussels sprouts and return to the oven.
  6. Once done, drizzle with balsamic vinegar and give everything a quick toss to coat.
  7. Serve hot and enjoy!

Holiday Pumpkin Pie

0

This classic Holiday Pumpkin Pie is the perfect dessert to bring warmth and tradition to your festive gatherings. Made with a smooth, spiced pumpkin filling and nestled in a flaky, buttery crust, this pie brings together the best flavors of the season. Cinnamon, nutmeg, and ginger blend harmoniously with the natural sweetness of pumpkin to create a rich, velvety filling. Topped with a dollop of whipped cream, this pie is sure to be the star of your dessert table.

Ingredients:

  • 1 unbaked 9-inch pie crust
  • 2 cups pumpkin puree (canned or fresh)
  • 1 cup heavy cream
  • ½ cup whole milk
  • ¾ cup granulated sugar
  • 2 large eggs
  • 1 teaspoon ground cinnamon
  • ½ teaspoon ground ginger
  • ¼ teaspoon ground nutmeg
  • ¼ teaspoon ground cloves
  • ¼ teaspoon salt
  • 1 teaspoon vanilla extract

Instructions:

  1. Preheat the oven to 425°F (220°C).
  2. In a large bowl, whisk together the pumpkin puree, heavy cream, milk, and eggs until smooth.
  3. Add the sugar, cinnamon, ginger, nutmeg, cloves, salt, and vanilla extract to the pumpkin mixture. Stir well until all the ingredients are fully combined.
  4. Pour the filling into the unbaked pie crust, spreading it evenly.
  5. Bake at 425°F for 15 minutes. Then, reduce the oven temperature to 350°F (175°C) and continue baking for an additional 40-50 minutes, or until the filling is set and a knife inserted into the center comes out clean.
  6. Remove the pie from the oven and let it cool completely on a wire rack before serving.
  7. Serve with whipped cream or ice cream, if desired.

Enjoy your Holiday Pumpkin Pie with family and friends!