Home Blog Page 16

CREAM OF CORN SOUP

Cream of Corn Soup is a comforting, velvety dish that celebrates the natural sweetness of corn. This rich and creamy soup is simple to prepare and can be enjoyed year-round, whether made with fresh, frozen, or canned corn. It’s perfect as a starter or a light meal when paired with crusty bread. The addition of onions, garlic, and a touch of cream enhances the flavor, creating a balanced, delicious soup that’s both hearty and satisfying.

Ingredients:

  • 4 cups fresh corn kernels (about 5-6 ears of corn), or frozen/canned corn
  • 2 tablespoons butter
  • 1 medium onion, finely chopped
  • 2 garlic cloves, minced
  • 3 cups vegetable or chicken broth
  • 1 cup heavy cream (or half-and-half for a lighter version)
  • 1 teaspoon sugar (optional, to enhance sweetness)
  • Salt and pepper, to taste
  • 1/4 teaspoon smoked paprika (optional, for a touch of smokiness)
  • Fresh chopped chives or cilantro for garnish

Instructions:

  1. Cook the onions and garlic: In a large pot, melt the butter over medium heat. Add the chopped onion and cook for 4-5 minutes, stirring occasionally, until soft and translucent. Add the minced garlic and cook for another minute until fragrant.
  2. Add the corn: Stir in the corn kernels (if using fresh corn, scrape the cobs to get all the juice and kernels). Cook for 2-3 minutes, stirring occasionally, to lightly sauté the corn.
  3. Add broth and simmer: Pour in the vegetable or chicken broth, bringing the mixture to a simmer. Let the soup cook for about 10-15 minutes, allowing the corn to soften and the flavors to meld.
  4. Blend the soup: Using an immersion blender, carefully blend the soup until smooth and creamy. If you prefer a chunkier texture, you can leave some corn pieces whole. Alternatively, you can transfer the soup in batches to a blender, then return it to the pot.
  5. Add the cream: Stir in the heavy cream, adjusting the thickness by adding more cream or broth if needed. Season with salt, pepper, and sugar (if using) to taste. For a hint of smokiness, stir in the smoked paprika.
  6. Heat through: Cook the soup for another 5 minutes on low heat to allow the flavors to come together. Be careful not to boil the cream.
  7. Serve: Ladle the creamy corn soup into bowls and garnish with fresh chopped chives or cilantro.

This Cream of Corn Soup is rich, comforting, and full of sweet corn flavor. Serve with warm bread or crackers for a simple, satisfying meal. Enjoy!


Zucchini Dip

0

Zucchini Dip is a light, flavorful appetizer that’s perfect for summer gatherings or as a healthy snack. This creamy dip showcases the subtle sweetness of zucchini, blended with garlic, herbs, and a touch of tangy yogurt or cream cheese for added richness. It’s a versatile dip that pairs beautifully with fresh vegetables, pita chips, or crackers, and can even be used as a spread for sandwiches or wraps. Easy to make and packed with nutrients, Zucchini Dip is a delicious way to enjoy this abundant summer vegetable in a new and exciting way.

Ingredients:

  • 2 medium zucchini, grated
  • 1 tablespoon olive oil
  • 2 cloves garlic, minced
  • 1/2 cup plain Greek yogurt or cream cheese, softened
  • 1/4 cup grated Parmesan cheese
  • 1 tablespoon fresh lemon juice
  • 1 teaspoon lemon zest
  • 1/4 teaspoon ground cumin
  • 1/4 teaspoon smoked paprika (optional)
  • Salt and pepper, to taste
  • 2 tablespoons fresh dill or parsley, chopped (for garnish)
  • Pita chips, crackers, or fresh vegetables, for serving

Instructions:

  1. Prepare the Zucchini: Place the grated zucchini in a clean kitchen towel and squeeze out any excess moisture. This helps prevent the dip from becoming too watery.
  2. Cook the Zucchini: In a large skillet, heat the olive oil over medium heat. Add the minced garlic and sauté for 1-2 minutes until fragrant. Add the grated zucchini and cook for 5-7 minutes, or until the zucchini is softened and most of the moisture has evaporated. Remove from heat and let it cool slightly.
  3. Mix the Dip: In a medium bowl, combine the cooked zucchini, Greek yogurt (or cream cheese), Parmesan cheese, lemon juice, lemon zest, ground cumin, and smoked paprika (if using). Stir until well combined. Season with salt and pepper to taste.
  4. Chill: Transfer the dip to a serving bowl, cover, and refrigerate for at least 30 minutes to allow the flavors to meld together.
  5. Garnish and Serve: Before serving, garnish the dip with chopped fresh dill or parsley. Serve with pita chips, crackers, or an assortment of fresh vegetables.

Zucchini Dip is a refreshing and versatile dish that brings a delightful combination of flavors and textures to your table, making it a perfect addition to any appetizer spread or snack lineup.

BEEF CARBONNADE

Beef Carbonnade, also known as Carbonnade à la Flamande, is a traditional Belgian stew made with tender beef slow-cooked in dark beer, onions, and a hint of mustard and thyme. This hearty dish has a rich, slightly sweet, and deeply savory flavor, thanks to the use of Belgian-style beer and caramelized onions. Often served with crusty bread or over mashed potatoes, this comforting stew is perfect for cold days or a cozy family meal.

Ingredients:

  • 2 pounds beef chuck, cut into 2-inch cubes
  • Salt and black pepper, to taste
  • 2 tablespoons all-purpose flour
  • 2 tablespoons butter
  • 1 tablespoon olive oil
  • 3 large onions, thinly sliced
  • 2 garlic cloves, minced
  • 1 tablespoon brown sugar
  • 1 tablespoon Dijon mustard
  • 2 cups Belgian-style dark beer (like a Dubbel or brown ale)
  • 1 cup beef broth
  • 2 tablespoons apple cider vinegar
  • 2 sprigs fresh thyme (or 1 teaspoon dried thyme)
  • 2 bay leaves
  • 1 tablespoon fresh parsley, chopped (for garnish)

Instructions:

  1. Season the beef: Pat the beef cubes dry with paper towels and season them generously with salt and pepper. Sprinkle with flour, tossing to coat the beef evenly.
  2. Brown the beef: In a large Dutch oven or heavy-bottomed pot, heat the butter and olive oil over medium-high heat. Working in batches, sear the beef cubes on all sides until browned, about 5-7 minutes per batch. Remove the beef and set aside.
  3. Caramelize the onions: In the same pot, reduce the heat to medium and add the sliced onions. Cook, stirring occasionally, until the onions are soft and golden brown, about 15-20 minutes. Add the minced garlic and cook for another minute.
  4. Add sugar and mustard: Stir the brown sugar and Dijon mustard into the onions, cooking for an additional 2 minutes to develop the flavors.
  5. Deglaze with beer: Pour the dark beer into the pot, scraping up any browned bits from the bottom of the pot. Add the beef broth, apple cider vinegar, thyme, and bay leaves. Stir to combine.
  6. Return the beef: Add the seared beef back into the pot, along with any juices that may have accumulated. Stir to coat the beef in the sauce.
  7. Simmer: Bring the stew to a simmer, then reduce the heat to low. Cover the pot and let it cook gently for 2-3 hours, or until the beef is tender and the flavors have melded. Stir occasionally to prevent sticking.
  8. Adjust seasoning and serve: Once the beef is tender, remove the thyme sprigs and bay leaves. Taste and adjust seasoning with salt and pepper if needed. Garnish with fresh parsley.
  9. Serve: Serve the Beef Carbonnade hot with crusty bread, mashed potatoes, or over buttered noodles for a truly comforting meal.

This Beef Carbonnade is rich and hearty, with the beer adding depth and the caramelized onions providing a slight sweetness. It’s a perfect dish for cool weather and pairs beautifully with Belgian beer!

Shrimp Linguine

0

Shrimp Linguine is a classic and elegant dish that combines tender, succulent shrimp with perfectly cooked linguine in a light, flavorful sauce. This dish is a beautiful blend of simplicity and sophistication, making it ideal for both weeknight dinners and special occasions. The sauce, typically made with garlic, white wine, lemon juice, and a touch of butter, enhances the natural sweetness of the shrimp while coating the pasta in a luscious, silky finish. With just a handful of fresh ingredients, Shrimp Linguine is a quick and satisfying meal that brings the taste of the sea to your table.

Ingredients:

  • 8 oz linguine pasta
  • 1 lb shrimp, peeled and deveined
  • 2 tablespoons olive oil
  • 3 cloves garlic, minced
  • 1/4 teaspoon red pepper flakes (optional, for heat)
  • 1/2 cup white wine (or chicken broth)
  • 1 lemon, juiced and zested
  • 2 tablespoons unsalted butter
  • Salt and pepper, to taste
  • 1/4 cup fresh parsley, chopped
  • Grated Parmesan cheese, for serving (optional)

Instructions:

  1. Cook the Pasta: Bring a large pot of salted water to a boil. Add the linguine and cook according to the package instructions until al dente. Reserve 1/2 cup of pasta water, then drain the pasta and set aside.
  2. Cook the Shrimp: In a large skillet, heat the olive oil over medium heat. Add the shrimp in a single layer and season with salt and pepper. Cook for 2-3 minutes on each side, or until the shrimp are pink and opaque. Remove the shrimp from the skillet and set aside.
  3. Sauté the Garlic: In the same skillet, add the minced garlic and red pepper flakes (if using). Sauté for about 1 minute, until the garlic is fragrant but not browned.
  4. Deglaze the Pan: Pour in the white wine (or chicken broth) and bring to a simmer, scraping up any browned bits from the bottom of the pan. Cook for 2-3 minutes, allowing the liquid to reduce slightly.
  5. Add Lemon and Butter: Stir in the lemon juice, lemon zest, and butter. Cook until the butter is melted and the sauce is well combined.
  6. Combine Pasta and Shrimp: Return the shrimp to the skillet, along with the cooked linguine. Toss everything together, adding a splash of the reserved pasta water if needed to loosen the sauce. Cook for an additional 2 minutes, until the pasta is coated with the sauce and everything is heated through.
  7. Serve: Transfer the Shrimp Linguine to serving plates. Garnish with chopped parsley and grated Parmesan cheese if desired. Serve immediately.

Shrimp Linguine is a delightful, easy-to-make dish that combines the fresh flavors of shrimp, garlic, and lemon in a way that’s both light and indulgent, making it a perfect choice for any meal.

PEANUT BUTTER PRETZEL BITES

0

Peanut Butter Pretzel Bites are the perfect sweet-and-salty treat, combining the creamy richness of peanut butter with the crunch of pretzels and a delicious chocolate coating. These bite-sized snacks are easy to make and are perfect for parties, as a quick snack, or even as a homemade gift. The contrast of flavors and textures makes them irresistible for peanut butter lovers!

Ingredients:

  • 1 cup creamy peanut butter
  • 2 tablespoons unsalted butter, softened
  • 1/4 cup brown sugar
  • 1 1/4 cups powdered sugar
  • 60 small pretzel twists (about 30 pairs)
  • 1 1/2 cups semi-sweet or milk chocolate chips
  • 1 tablespoon coconut oil or vegetable shortening (optional, for smooth coating)

Instructions:

  1. Make the peanut butter filling: In a medium bowl, mix together the peanut butter, softened butter, and brown sugar until well combined. Gradually add the powdered sugar, stirring until a thick dough forms. The mixture should be firm enough to roll into balls. If it’s too sticky, add a little more powdered sugar.
  2. Form the bites: Scoop about 1 teaspoon of the peanut butter mixture and roll it into a ball. Sandwich the peanut butter ball between two pretzels, pressing gently to flatten slightly. Place each bite on a baking sheet lined with parchment paper. Repeat until all the peanut butter mixture is used.
  3. Chill the pretzel bites: Place the tray of peanut butter pretzel bites in the freezer for 20-30 minutes to firm up before dipping them in chocolate.
  4. Melt the chocolate: In a microwave-safe bowl, melt the chocolate chips and coconut oil (if using) in 30-second increments, stirring between each interval until the chocolate is smooth and fully melted. Alternatively, you can melt the chocolate in a double boiler.
  5. Dip the pretzel bites: Remove the chilled peanut butter pretzel bites from the freezer. Using a fork or dipping tool, dip each bite halfway into the melted chocolate, allowing the excess chocolate to drip off. Place the dipped bites back onto the parchment-lined tray.
  6. Chill again: Once all the pretzel bites are dipped, place the tray in the refrigerator for 10-15 minutes to allow the chocolate to set.
  7. Serve: Once the chocolate has hardened, the Peanut Butter Pretzel Bites are ready to enjoy! Store them in an airtight container in the refrigerator for up to a week.

These Peanut Butter Pretzel Bites offer the perfect combination of sweet, salty, creamy, and crunchy. They’re a delightful treat that’s as fun to make as they are to eat!

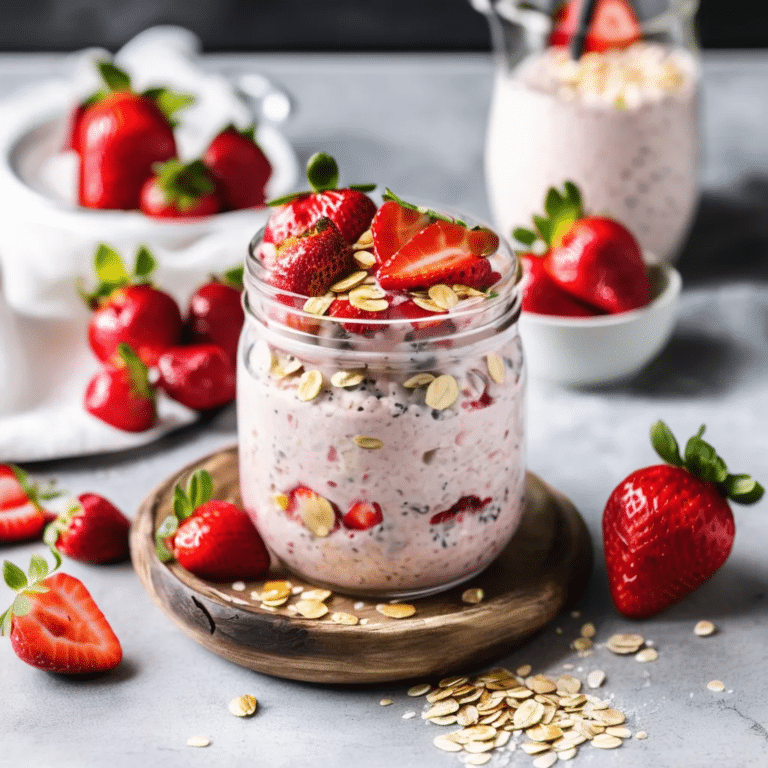
Strawberry Overnight Oats

0

Strawberry Overnight Oats are a delicious and nutritious way to kickstart your day, offering a quick and easy breakfast that’s both satisfying and refreshing. Prepared the night before, these oats soak up the flavors of fresh strawberries, creamy yogurt, and a touch of honey, creating a rich, flavorful meal that’s ready to grab and go in the morning. With the natural sweetness of strawberries and the wholesome goodness of oats, this recipe is perfect for busy mornings when you want something healthy and filling without the hassle. Just a few minutes of prep time the night before, and you’ll wake up to a ready-made breakfast that’s packed with flavor and nutrition.

Ingredients:

  • 1/2 cup rolled oats
  • 1/2 cup milk (dairy or plant-based)
  • 1/4 cup plain or vanilla Greek yogurt
  • 1 tablespoon chia seeds (optional, for added texture and nutrition)
  • 1 tablespoon honey or maple syrup
  • 1/2 cup fresh strawberries, chopped
  • 1/2 teaspoon vanilla extract (optional)
  • Additional strawberries or nuts for topping (optional)

Instructions:

  1. Combine the Ingredients: In a mason jar or a small bowl, combine the rolled oats, milk, Greek yogurt, chia seeds (if using), honey or maple syrup, and vanilla extract (if using). Stir until all the ingredients are well combined.
  2. Add the Strawberries: Gently fold in the chopped strawberries, making sure they are evenly distributed throughout the mixture.
  3. Refrigerate Overnight: Cover the jar or bowl with a lid or plastic wrap and refrigerate overnight, or for at least 4 hours. During this time, the oats will absorb the liquid and soften, creating a creamy, pudding-like consistency.
  4. Serve: In the morning, give the oats a good stir. If the mixture is too thick, you can add a splash of milk to reach your desired consistency. Top with additional strawberries, nuts, or other toppings of your choice.
  5. Enjoy: Enjoy your Strawberry Overnight Oats cold, straight from the jar or bowl. They can also be taken on the go for a quick and easy breakfast.

Strawberry Overnight Oats are a flavorful and convenient breakfast option that’s perfect for busy mornings. Packed with fiber, protein, and the natural sweetness of strawberries, this make-ahead meal will keep you energized and satisfied throughout the day.

SAUSAGE CORNBREAD STUFFING

Sausage Cornbread Stuffing is a flavorful, hearty side dish that’s perfect for holiday dinners or any cozy gathering. Combining the savory richness of sausage with the slightly sweet, crumbly texture of cornbread, this stuffing is packed with herbs, onions, celery, and a touch of broth to create the perfect balance of flavors. It’s the ideal accompaniment to roast turkey, chicken, or even served on its own as a satisfying dish.

Ingredients:

  • 8 cups cornbread, cut into cubes (preferably day-old or toasted)
  • 1 pound sausage (Italian, breakfast, or your favorite variety)
  • 2 tablespoons butter
  • 1 large onion, diced
  • 2 celery stalks, diced
  • 3 garlic cloves, minced
  • 1 tablespoon fresh sage, chopped (or 1 teaspoon dried)
  • 1 tablespoon fresh thyme, chopped (or 1 teaspoon dried)
  • 1/4 cup fresh parsley, chopped
  • 1/2 teaspoon salt
  • 1/2 teaspoon black pepper
  • 1 1/2 to 2 cups chicken or turkey broth (depending on desired moistness)
  • 2 large eggs, lightly beaten

Instructions:

  1. Preheat the oven: Preheat your oven to 350°F (175°C). Grease a large baking dish or casserole dish and set aside.
  2. Toast the cornbread: If your cornbread is fresh, spread the cubes on a baking sheet and toast in the preheated oven for about 10 minutes, until lightly browned and dry. Let cool and set aside. If using day-old cornbread, you can skip this step.
  3. Cook the sausage: In a large skillet over medium heat, cook the sausage, breaking it into small pieces with a spoon, until browned and cooked through. Transfer the cooked sausage to a large mixing bowl, leaving the rendered fat in the skillet.
  4. Sauté the vegetables: In the same skillet, add the butter. Once melted, sauté the onions and celery for about 5-7 minutes until softened. Add the minced garlic, sage, thyme, salt, and pepper, and cook for an additional 1-2 minutes, until fragrant.
  5. Combine ingredients: Transfer the sautéed vegetables to the bowl with the cooked sausage. Add the toasted cornbread cubes, parsley, and stir gently to combine.
  6. Add the broth and eggs: Pour 1 1/2 cups of chicken or turkey broth over the mixture and stir gently. Add the lightly beaten eggs and mix well. If you prefer a moister stuffing, you can add up to 2 cups of broth.
  7. Bake: Transfer the stuffing mixture to the prepared baking dish, spreading it out evenly. Cover the dish with foil and bake in the preheated oven for 30 minutes. After 30 minutes, remove the foil and bake for an additional 15-20 minutes, until the top is golden brown and crispy.
  8. Serve: Remove the stuffing from the oven and let it rest for 5 minutes before serving.

This Sausage Cornbread Stuffing is rich, flavorful, and full of comforting textures. It pairs perfectly with roasted meats and gravy, making it a must-have for your holiday table!

HOMEMADE RICOTTA

Making homemade ricotta is surprisingly simple and rewarding. The result is a soft, creamy cheese with a rich, fresh flavor that far surpasses store-bought versions. With just a few basic ingredients, you can whip up ricotta cheese that works beautifully in both sweet and savory dishes. Whether you’re spreading it on toast, stirring it into pasta, or using it in desserts, homemade ricotta will quickly become a kitchen staple.

Ingredients:

  • 4 cups whole milk
  • 1 cup heavy cream (optional, for extra richness)
  • 1/2 teaspoon salt
  • 3 tablespoons fresh lemon juice (or white vinegar)

Instructions:

  1. Heat the milk: In a large pot, combine the milk, heavy cream (if using), and salt. Heat the mixture over medium heat, stirring occasionally, until it reaches a simmer. Do not let it boil. You want to see steam rising and tiny bubbles forming around the edges of the pot.
  2. Add the acid: Once the milk mixture is hot, remove it from the heat and stir in the lemon juice (or vinegar). Let the mixture sit undisturbed for 5-10 minutes. You will see curds forming as the milk separates into curds (solid) and whey (liquid).
  3. Strain the curds: Line a fine-mesh sieve or colander with cheesecloth or a clean kitchen towel and place it over a large bowl or pot. Carefully pour the curds and whey into the sieve, allowing the liquid whey to drain through while the curds remain in the cheesecloth. Let it drain for 5-20 minutes, depending on how creamy or firm you like your ricotta. For a creamier ricotta, drain for a shorter time; for firmer ricotta, drain longer.
  4. Cool and store: Once the ricotta has drained to your desired consistency, transfer it to a bowl and enjoy immediately or cover and refrigerate. Homemade ricotta will keep in the fridge for up to 4-5 days.

Optional:

  • Flavoring: For savory applications, you can add fresh herbs, a drizzle of olive oil, or extra salt to taste. For sweet dishes, stir in a touch of honey or vanilla.

Tips:

  • The leftover whey can be used in smoothies, soups, or as a liquid in bread making.
  • Fresh ricotta is best eaten the same day but can be stored for up to a few days in an airtight container.

This homemade ricotta is creamy, rich, and so versatile. It’s perfect for lasagna, stuffed shells, or just spread on crusty bread with a drizzle of honey!

Tomato And Basil Bruschetta

0

Tomato and Basil Bruschetta is a classic Italian appetizer that perfectly captures the fresh, vibrant flavors of ripe tomatoes, aromatic basil, and garlic. Served atop crispy slices of toasted baguette, this simple yet delicious dish is a celebration of fresh ingredients and bold flavors. Whether you’re hosting a summer gathering or looking for a light, flavorful starter, Tomato and Basil Bruschetta is a crowd-pleaser that’s quick and easy to prepare. With its bright, tangy topping and crunchy base, this dish is the perfect way to start any meal.

Ingredients:

  • 1 baguette, sliced into 1/2-inch thick rounds
  • 4-5 ripe tomatoes, diced
  • 2 cloves garlic, minced
  • 1/4 cup fresh basil leaves, chopped
  • 2 tablespoons extra virgin olive oil, plus more for brushing
  • 1 tablespoon balsamic vinegar (optional)
  • Salt and pepper, to taste
  • 1/4 cup grated Parmesan cheese (optional)
  • Balsamic glaze (optional, for drizzling)

Instructions:

  1. Prepare the Bread: Preheat your oven to 400°F (200°C). Arrange the baguette slices on a baking sheet and lightly brush each slice with olive oil. Toast the bread in the preheated oven for 8-10 minutes, or until golden brown and crispy. Remove from the oven and set aside.
  2. Make the Tomato Topping: In a medium mixing bowl, combine the diced tomatoes, minced garlic, chopped basil, extra virgin olive oil, and balsamic vinegar (if using). Season with salt and pepper to taste. Stir everything together gently to combine, and let the mixture sit for 10-15 minutes to allow the flavors to meld.
  3. Assemble the Bruschetta: Spoon the tomato and basil mixture onto each toasted baguette slice, making sure to evenly distribute the topping. If desired, sprinkle a small amount of grated Parmesan cheese on top of each bruschetta.
  4. Serve: Arrange the bruschetta on a serving platter. If you like, drizzle with a bit of balsamic glaze for an extra touch of flavor and presentation.

Tomato and Basil Bruschetta is a delightful appetizer that showcases the fresh, simple flavors of Mediterranean cuisine. Perfect for any occasion, this dish is sure to impress with its vibrant taste and easy preparation.

CINNAMON SWIRL COFFEE CAKE

Cinnamon Swirl Coffee Cake is a soft, tender cake infused with layers of cinnamon-sugar goodness. Perfect for breakfast, brunch, or as a sweet afternoon treat, this coffee cake features a delicious swirl of cinnamon throughout the batter and a crumbly streusel topping that adds a satisfying crunch. Pair it with a cup of coffee or tea for a cozy, comforting experience.

Ingredients:

For the Cake:

  • 2 cups all-purpose flour
  • 1 1/2 teaspoons baking powder
  • 1/2 teaspoon baking soda
  • 1/2 teaspoon salt
  • 1/2 cup unsalted butter, softened
  • 1 cup granulated sugar
  • 2 large eggs
  • 1 teaspoon vanilla extract
  • 1 cup sour cream or Greek yogurt

For the Cinnamon Swirl:

  • 1/3 cup brown sugar
  • 1 tablespoon ground cinnamon

For the Streusel Topping:

  • 1/2 cup all-purpose flour
  • 1/3 cup brown sugar
  • 1 teaspoon ground cinnamon
  • 1/4 cup unsalted butter, cold and cubed

Instructions:

  1. Preheat the oven: Preheat your oven to 350°F (175°C). Grease and flour a 9×9-inch square baking pan or a similar-sized baking dish.
  2. Mix the dry ingredients: In a medium bowl, whisk together the flour, baking powder, baking soda, and salt. Set aside.
  3. Cream the butter and sugar: In a large bowl, cream together the softened butter and granulated sugar using an electric mixer until light and fluffy, about 3-4 minutes. Add the eggs, one at a time, beating well after each addition. Mix in the vanilla extract.
  4. Add the sour cream: On low speed, add the sour cream (or Greek yogurt) and mix until just combined.
  5. Add the dry ingredients: Gradually add the dry ingredients to the wet ingredients, mixing until just combined. Be careful not to overmix, as this can make the cake dense.
  6. Prepare the cinnamon swirl: In a small bowl, mix together the brown sugar and cinnamon.
  7. Layer the cake: Pour half of the cake batter into the prepared pan and spread it out evenly. Sprinkle the cinnamon-sugar mixture evenly over the batter. Then, pour the remaining cake batter over the cinnamon layer and spread it out gently with a spatula.
  8. Make the streusel topping: In a small bowl, combine the flour, brown sugar, and cinnamon for the streusel. Add the cold, cubed butter and use a pastry cutter or your fingers to mix until crumbly.
  9. Add the streusel topping: Sprinkle the streusel evenly over the top of the cake batter.
  10. Bake: Bake the coffee cake in the preheated oven for 35-40 minutes, or until a toothpick inserted into the center comes out clean. If the top is browning too quickly, you can cover it with foil during the last 10 minutes of baking.
  11. Cool and serve: Allow the cake to cool in the pan for 10-15 minutes before slicing and serving. Enjoy it warm or at room temperature, ideally with a cup of coffee or tea.

This Cinnamon Swirl Coffee Cake is moist, buttery, and packed with cinnamon flavor. It’s the perfect sweet treat for breakfast or a cozy afternoon snack!