Home Blog Page 9

COLD ASIAN NOODLE SALAD

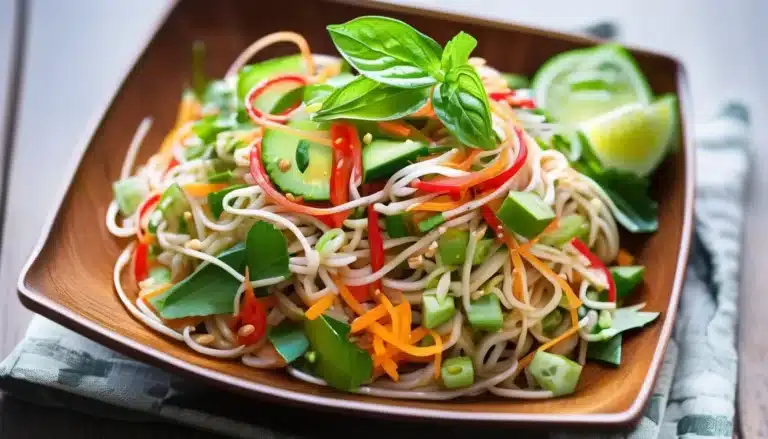
Cold Asian Noodle Salad is a refreshing and light dish that’s packed with crunchy vegetables, tender noodles, and a tangy, savory dressing. This salad is perfect for warm weather or as a healthy side dish. It’s easily customizable and can be made ahead of time, making it a great option for meal prep or picnics.

Ingredients:

For the Salad:

  • 8 oz rice noodles, soba noodles, or thin spaghetti
  • 1 cup shredded carrots
  • 1 cup cucumber, julienned or thinly sliced
  • 1 red bell pepper, thinly sliced
  • 1/4 cup fresh cilantro, chopped
  • 1/4 cup green onions, sliced
  • 1/4 cup toasted peanuts or sesame seeds (for garnish)

For the Dressing:

  • 1/4 cup soy sauce or tamari (for gluten-free)
  • 2 tablespoons rice vinegar
  • 1 tablespoon sesame oil
  • 1 tablespoon honey or maple syrup
  • 1 tablespoon lime juice (or lemon juice)
  • 1 teaspoon fresh ginger, grated
  • 1 garlic clove, minced
  • 1-2 teaspoons sriracha or chili sauce (optional, for heat)

Instructions:

  1. Cook the noodles: Bring a large pot of water to a boil and cook the noodles according to the package instructions. Drain and rinse the noodles under cold water to stop the cooking process. Set aside to cool completely.
  2. Prepare the vegetables: While the noodles are cooling, prep the vegetables by shredding the carrots, julienning the cucumbers and bell peppers, and chopping the cilantro and green onions.
  3. Make the dressing: In a small bowl, whisk together the soy sauce, rice vinegar, sesame oil, honey (or maple syrup), lime juice, grated ginger, minced garlic, and sriracha (if using). Taste and adjust the seasoning as needed.
  4. Assemble the salad: In a large mixing bowl, combine the cooled noodles, shredded carrots, cucumbers, bell peppers, cilantro, and green onions. Pour the dressing over the salad and toss everything together until well coated.
  5. Garnish and serve: Garnish with toasted peanuts or sesame seeds for extra crunch. Serve immediately, or refrigerate for 30 minutes to let the flavors meld before serving.

Tips:

  • Protein add-ins: Add grilled chicken, shrimp, or tofu for a more substantial meal.
  • Make ahead: This salad can be made a day in advance and stored in the fridge, making it perfect for meal prep or parties.

This Cold Asian Noodle Salad is a perfect blend of refreshing, crunchy vegetables and a savory, tangy dressing. It’s light yet satisfying, making it a great option for a quick lunch or side dish!


Blueberry Clafoutis

0

Blueberry Clafoutis is a delightful French dessert that combines the simplicity of a baked custard with the juicy burst of fresh blueberries. This rustic dessert is incredibly easy to prepare, yet elegant enough to impress at any gathering. The batter, similar to that of a thick crepe, is poured over fresh blueberries and baked until golden and slightly puffed. The result is a tender, custard-like treat with a light, airy texture and pockets of sweet, tangy blueberries in every bite. Serve it warm, dusted with powdered sugar, for a dessert that’s both comforting and refined.

Ingredients:

  • 1 cup fresh blueberries (or frozen, thawed and drained)
  • 3 large eggs
  • 1/2 cup granulated sugar
  • 1 cup whole milk
  • 1/2 cup all-purpose flour
  • 1/2 tsp vanilla extract
  • 1/4 tsp salt
  • Zest of 1 lemon (optional, for added flavor)
  • Powdered sugar, for dusting

Instructions:

  1. Preheat the Oven: Preheat your oven to 350°F (175°C). Grease a 9-inch pie dish or cast-iron skillet with butter.
  2. Prepare the Batter: In a large bowl, whisk together the eggs and sugar until well combined and slightly frothy. Add the milk, flour, vanilla extract, salt, and lemon zest (if using). Whisk until the batter is smooth and free of lumps.
  3. Arrange the Blueberries: Spread the blueberries evenly across the bottom of the greased dish.
  4. Pour the Batter: Pour the batter over the blueberries, ensuring they are evenly distributed.
  5. Bake: Place the dish in the preheated oven and bake for 35-40 minutes, or until the clafoutis is golden and set in the center. The edges should be slightly puffed, and a toothpick inserted into the center should come out clean.
  6. Cool and Serve: Allow the clafoutis to cool slightly before dusting with powdered sugar. Serve warm or at room temperature.

Blueberry Clafoutis is a perfect way to enjoy the natural sweetness of blueberries in a light and elegant dessert. It’s quick to make and sure to be a favorite for brunch or an after-dinner treat.

ITALIAN MERINGUE

Italian Meringue is a smooth, glossy, and stable meringue made by slowly pouring hot sugar syrup into whipped egg whites. It’s often used in desserts like buttercream frosting, mousses, or as a topping for pies and tarts. This type of meringue is firm and holds its shape well, making it perfect for piping or as a base for other recipes.

Ingredients:

  • 4 large egg whites, room temperature
  • 1 cup granulated sugar
  • 1/4 cup water
  • 1/4 teaspoon cream of tartar (optional, for extra stability)
  • 1/4 teaspoon salt (optional)

Instructions:

  1. Prepare the sugar syrup: In a small saucepan, combine the sugar and water. Stir to dissolve the sugar, then bring the mixture to a boil over medium heat without stirring. Use a candy thermometer to monitor the temperature. You want the sugar syrup to reach 240°F (115°C), known as the “soft ball” stage.
  2. Whip the egg whites: While the sugar syrup is heating, place the egg whites (and cream of tartar, if using) in the bowl of a stand mixer fitted with the whisk attachment, or use a hand mixer. Whip the egg whites on medium speed until soft peaks form.
  3. Add the hot sugar syrup: Once the sugar syrup reaches 240°F, remove it from the heat. With the mixer running on medium-low speed, slowly and carefully pour the hot sugar syrup in a thin, steady stream into the whipped egg whites. Be careful not to pour the syrup directly onto the whisk, as it may splash.
  4. Whip the meringue: Once all the syrup is added, increase the mixer speed to high and continue whipping the egg whites until the meringue becomes thick, glossy, and the bowl has cooled to room temperature, about 7-10 minutes.
  5. Use or store: Use the Italian meringue immediately for piping or spreading onto desserts. If you plan to store it, cover it tightly and refrigerate for up to 2 days.

Tips:

  • Ensure no yolks: Make sure there are no traces of egg yolks in your whites, as this can prevent the meringue from whipping properly.
  • Stabilizing: The cream of tartar helps stabilize the egg whites and is especially helpful if you’re new to making meringue.

This Italian Meringue is light, silky, and beautifully stable. It can be used as a base for buttercream, a frosting for cakes, or even torched for a perfect pie topping!

Grilled Corn On The Cob

0

Grilled Corn On The Cob is a summertime classic that brings out the natural sweetness of fresh corn while adding a smoky, charred flavor that’s simply irresistible. This easy and versatile side dish is perfect for barbecues, picnics, or any outdoor gathering. The corn is grilled to perfection, then slathered with butter and sprinkled with your choice of seasonings, creating a deliciously juicy and flavorful treat. Whether you prefer it simple with just salt and pepper or dressed up with herbs and cheese, Grilled Corn On The Cob is always a crowd-pleaser.

Ingredients:

  • 4 ears of fresh corn, husked
  • 2 tbsp olive oil or melted butter
  • Salt and pepper, to taste
  • Optional toppings: grated Parmesan cheese, chopped fresh herbs (such as cilantro or parsley), chili powder, lime wedges

Instructions:

  1. Preheat the Grill: Preheat your grill to medium-high heat (about 375-400°F or 190-200°C).
  2. Prepare the Corn: Brush each ear of corn with olive oil or melted butter, ensuring it is evenly coated. Season with salt and pepper.
  3. Grill the Corn: Place the corn directly on the grill grates. Grill for 10-15 minutes, turning occasionally, until the corn is evenly charred on all sides. The kernels should be tender and have a nice, smoky char.
  4. Add Toppings: Remove the corn from the grill and immediately brush with more butter if desired. Sprinkle with your choice of toppings, such as Parmesan cheese, chopped herbs, or a squeeze of lime juice.
  5. Serve: Serve the grilled corn hot, with extra toppings on the side for guests to customize their own.

Grilled Corn On The Cob is a simple yet flavorful dish that enhances the natural sweetness of corn with a smoky grill flavor. It’s a perfect side dish for any outdoor meal, bringing the taste of summer to your table.

Chili Crab

0

Chili Crab is a mouthwatering dish that perfectly balances sweet, savory, and spicy flavors, making it one of the most beloved seafood dishes in Southeast Asia. This iconic dish features succulent crabs coated in a rich, tangy, and slightly spicy tomato-based sauce, infused with garlic, ginger, and chili. The combination of tender crab meat and the bold flavors of the sauce creates an unforgettable taste experience. Whether served with steamed rice or crusty bread to soak up the delicious sauce, Chili Crab is a dish that’s sure to impress at any dinner table.

Ingredients:

  • 2 large crabs (about 1.5 lbs each), cleaned and cut into pieces
  • 2 tbsp vegetable oil
  • 1 onion, finely chopped
  • 4 cloves garlic, minced
  • 1-inch piece of ginger, minced
  • 2-3 red chilies, minced (adjust according to heat preference)
  • 1/4 cup tomato ketchup
  • 2 tbsp chili sauce (like Sriracha or sambal oelek)
  • 1 tbsp soy sauce
  • 1 tbsp rice vinegar or white vinegar
  • 1 tbsp sugar
  • 1/2 cup chicken broth or water
  • 1 tbsp cornstarch mixed with 2 tbsp water (optional, for thickening)
  • 1 egg, lightly beaten
  • Fresh cilantro, for garnish
  • Lime wedges, for serving

Instructions:

  1. Prepare the Crabs: Clean the crabs thoroughly and cut them into manageable pieces. Crack the claws slightly to allow the flavors to penetrate the meat.
  2. Sauté the Aromatics: Heat the vegetable oil in a large wok or deep skillet over medium heat. Add the chopped onion, garlic, ginger, and minced chilies. Sauté until the onions are soft and fragrant, about 3-4 minutes.
  3. Make the Sauce: Stir in the tomato ketchup, chili sauce, soy sauce, vinegar, and sugar. Cook for another 2 minutes until the sauce is well combined and begins to thicken slightly.
  4. Cook the Crabs: Add the crab pieces to the wok and toss them in the sauce, ensuring they are well coated. Pour in the chicken broth or water and bring the mixture to a simmer. Cover the wok and cook for 10-12 minutes, or until the crab meat is fully cooked and the flavors have melded together.
  5. Thicken the Sauce: If you prefer a thicker sauce, stir in the cornstarch mixture and cook for an additional 1-2 minutes, stirring constantly until the sauce thickens.
  6. Add the Egg: Slowly drizzle the beaten egg into the wok while stirring gently to create silky egg ribbons throughout the sauce.
  7. Serve: Transfer the Chili Crab to a serving dish, garnish with fresh cilantro, and serve with lime wedges on the side. Enjoy with steamed rice or crusty bread to soak up the delicious sauce.

Chili Crab is a dish that brings a taste of Southeast Asian culinary tradition to your home, offering a delightful mix of flavors that will have everyone coming back for more.

GRILLED LEMON CHICKEN

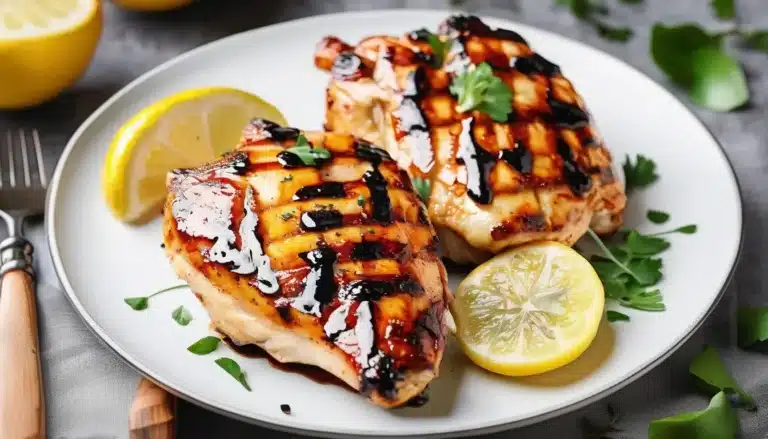
Grilled Lemon Chicken is a simple and flavorful dish that’s perfect for summer grilling or a light weeknight dinner. Marinated in a tangy lemon, garlic, and herb mixture, this chicken is juicy, tender, and full of fresh flavor. Serve it with grilled vegetables, a side salad, or your favorite grain for a complete meal.

Ingredients:

  • 4 boneless, skinless chicken breasts (or thighs)
  • 1/4 cup olive oil
  • 1/4 cup fresh lemon juice (about 2 lemons)
  • 2 teaspoons lemon zest
  • 3 garlic cloves, minced
  • 1 tablespoon fresh thyme (or 1 teaspoon dried thyme)
  • 1 tablespoon fresh oregano (or 1 teaspoon dried oregano)
  • 1 teaspoon salt
  • 1/2 teaspoon ground black pepper
  • 1 teaspoon honey or maple syrup (optional, for a hint of sweetness)
  • Lemon wedges and fresh parsley for garnish

Instructions:

  1. Make the marinade: In a small bowl, whisk together the olive oil, lemon juice, lemon zest, minced garlic, thyme, oregano, salt, pepper, and honey (if using).
  2. Marinate the chicken: Place the chicken breasts in a large resealable plastic bag or shallow dish. Pour the marinade over the chicken, making sure it’s well coated. Seal the bag or cover the dish and refrigerate for at least 30 minutes, or up to 4 hours for more flavor.
  3. Preheat the grill: Preheat your grill to medium-high heat (about 375°F to 400°F). Lightly oil the grates to prevent sticking.
  4. Grill the chicken: Remove the chicken from the marinade and shake off any excess. Place the chicken on the grill and cook for 6-7 minutes per side, or until the internal temperature reaches 165°F (75°C). Cooking times may vary depending on the thickness of the chicken breasts.
  5. Rest and serve: Once cooked, remove the chicken from the grill and let it rest for 5 minutes before serving. This helps retain the juices.
  6. Garnish: Serve the grilled lemon chicken with lemon wedges for squeezing and sprinkle with fresh parsley.

Tips:

  • Pound the chicken: For even cooking, you can pound the chicken breasts to an even thickness before marinating.
  • Use a grill pan: If you don’t have an outdoor grill, a grill pan on the stovetop works just as well.

This Grilled Lemon Chicken is bright, zesty, and packed with flavor. It’s perfect for pairing with grilled veggies, a side of rice, or even in a salad for a refreshing, healthy meal!

Curried Tuna Salad

0

This Curried Tuna Salad is a delightful twist on the classic tuna salad, offering bold, warm flavors that come from a blend of curry powder, fresh herbs, and a touch of sweetness from raisins. It’s a versatile dish that can be served in many ways—whether on a bed of greens, in a sandwich, or wrapped in lettuce leaves. The combination of creamy mayo, tangy Greek yogurt, and aromatic spices makes this salad rich in texture and flavor. It’s a great option for a quick lunch or a light, flavorful dinner.

Ingredients:

  • 2 cans (5 oz each) tuna, drained
  • 1/4 cup mayonnaise
  • 1/4 cup Greek yogurt
  • 1 tablespoon curry powder (adjust to taste)
  • 1/4 cup raisins or dried cranberries
  • 1/4 cup chopped celery
  • 1/4 cup chopped red onion
  • 2 tablespoons fresh cilantro or parsley, chopped
  • 1 tablespoon lemon juice
  • Salt and pepper to taste
  • Optional: sliced almonds or cashews for garnish

Instructions:

  1. In a large bowl, combine the drained tuna, mayonnaise, and Greek yogurt. Mix until the tuna is fully coated.
  2. Stir in the curry powder, making sure it’s evenly distributed throughout the mixture.
  3. Add the raisins, celery, red onion, and chopped cilantro (or parsley). Mix well.
  4. Drizzle with lemon juice and season with salt and pepper to taste.
  5. If desired, top with sliced almonds or cashews for added crunch.
  6. Serve chilled on a bed of lettuce, in a sandwich, or as a wrap.

Enjoy this flavorful spin on a classic tuna salad that’s both satisfying and healthy!

Swiss Chard Frittata

0

This Swiss Chard Frittata is a wholesome and flavorful dish that’s perfect for breakfast, brunch, or a light dinner. Packed with nutrient-rich Swiss chard, creamy cheese, and fluffy eggs, this frittata is both hearty and healthy. The slightly bitter taste of the chard is balanced by the savory richness of the eggs and the creaminess of the cheese, creating a well-rounded dish that’s easy to make and sure to satisfy. Whether you’re serving it hot from the oven or enjoying it cold the next day, this frittata is versatile and delicious.

Ingredients:

  • 1 bunch Swiss chard, stems removed and leaves chopped
  • 1 small onion, finely chopped
  • 2 cloves garlic, minced
  • 8 large eggs
  • 1/4 cup milk or cream
  • 1/2 cup grated Parmesan or feta cheese
  • 1/2 cup shredded mozzarella or cheddar cheese
  • 2 tbsp olive oil
  • Salt and pepper, to taste
  • 1/4 tsp crushed red pepper flakes (optional)

Instructions:

  1. Preheat the Oven: Preheat your oven to 375°F (190°C).
  2. Sauté the Vegetables: In a large oven-safe skillet, heat the olive oil over medium heat. Add the chopped onion and garlic, and sauté until they are soft and fragrant, about 3-4 minutes. Add the chopped Swiss chard and cook until it wilts and any excess moisture evaporates, about 5 minutes. Season with salt, pepper, and red pepper flakes if using.
  3. Prepare the Egg Mixture: In a large bowl, whisk together the eggs and milk or cream until well combined. Stir in the Parmesan or feta cheese, and season with a little more salt and pepper.
  4. Combine and Cook: Pour the egg mixture over the sautéed vegetables in the skillet. Sprinkle the shredded mozzarella or cheddar cheese evenly over the top. Cook on the stovetop over medium-low heat for about 3-4 minutes, until the edges start to set.
  5. Bake the Frittata: Transfer the skillet to the preheated oven and bake for 12-15 minutes, or until the frittata is fully set and lightly golden on top. You can test it by inserting a knife into the center; it should come out clean.
  6. Serve: Remove the skillet from the oven and let the frittata cool for a few minutes before slicing. Serve warm or at room temperature, and enjoy!

This Swiss Chard Frittata is a perfect way to incorporate more greens into your diet while enjoying a satisfying and flavorful meal. Pair it with a simple salad or some crusty bread for a complete meal!

Lemon Melting Moments

0

Lemon Melting Moments are delicate, buttery cookies that quite literally melt in your mouth, offering a burst of bright lemon flavor with every bite. These tender cookies are perfect for afternoon tea, a light dessert, or a sweet gift. Made with simple ingredients like butter, cornstarch, and lemon zest, they have a soft, crumbly texture that pairs wonderfully with the tangy-sweet lemon icing. Their small size and exquisite taste make them irresistible, and they’re sure to become a favorite in your cookie repertoire.

Ingredients:

For the Cookies:

  • 1 cup unsalted butter, softened
  • 1/2 cup powdered sugar
  • 1 tsp vanilla extract
  • 1 1/2 cups all-purpose flour
  • 1/2 cup cornstarch
  • 1/4 tsp salt
  • Zest of 1 lemon

For the Lemon Icing:

  • 1 cup powdered sugar
  • 2-3 tbsp fresh lemon juice
  • Zest of 1 lemon (optional, for garnish)

Instructions:

  1. Preheat the Oven: Preheat your oven to 350°F (175°C). Line a baking sheet with parchment paper.
  2. Make the Cookie Dough: In a large bowl, cream together the softened butter and powdered sugar until light and fluffy. Add the vanilla extract and lemon zest, and mix until combined.
  3. Add the Dry Ingredients: Sift together the all-purpose flour, cornstarch, and salt. Gradually add the dry ingredients to the butter mixture, mixing until a soft dough forms.
  4. Shape the Cookies: Roll the dough into small balls, about 1 inch in diameter. Place the balls on the prepared baking sheet, spacing them about 2 inches apart. Use a fork to gently press down on each ball, creating a slight indent.
  5. Bake: Bake the cookies for 10-12 minutes, or until the edges are just starting to turn golden. The cookies should still be pale in color. Remove from the oven and let them cool on the baking sheet for a few minutes before transferring them to a wire rack to cool completely.
  6. Prepare the Lemon Icing: In a small bowl, whisk together the powdered sugar and lemon juice until smooth and slightly thickened. If desired, add more lemon juice for a thinner consistency.
  7. Ice the Cookies: Once the cookies are completely cooled, drizzle or spread the lemon icing over the tops. For an extra lemony touch, sprinkle a bit of lemon zest over the icing before it sets.
  8. Serve and Enjoy: Allow the icing to set before serving. These cookies can be stored in an airtight container for up to a week, though they rarely last that long!

Lemon Melting Moments are a delightful treat that combines the zing of lemon with the tenderness of a shortbread-like cookie, making them perfect for any occasion where a little sweetness is needed.

Spicy Roasted Red Pepper Hummus

0

This spicy roasted red pepper hummus is a vibrant and flavorful twist on traditional hummus. It combines the creamy goodness of chickpeas with the smoky sweetness of roasted red peppers, and a hint of heat from cayenne pepper or red pepper flakes. Perfect as a dip for veggies or pita, or even as a spread for sandwiches, this hummus is both healthy and packed with bold flavors. The roasted red peppers add a deep, smoky richness, while the garlic, tahini, and lemon juice bring it all together for a balanced, zesty finish.

Ingredients:

  • 1 can (15 oz) chickpeas, drained and rinsed
  • 1 large roasted red pepper (or 2 smaller ones), peeled and chopped
  • 3 tbsp tahini
  • 2 tbsp extra virgin olive oil
  • 2 garlic cloves, minced
  • 2 tbsp lemon juice (freshly squeezed)
  • 1 tsp ground cumin
  • 1/2 tsp cayenne pepper (adjust for spice level)
  • 1/2 tsp smoked paprika
  • Salt to taste
  • Water as needed for consistency
  • Red pepper flakes (optional, for garnish)
  • Olive oil (optional, for drizzling)
  • Fresh parsley (optional, for garnish)

Instructions:

  1. Roast the peppers: If using fresh red peppers, roast them by placing them under the broiler or over an open flame until the skins are charred. Let them cool in a covered bowl, then peel off the skins and remove the seeds.
  2. Blend ingredients: In a food processor, combine chickpeas, roasted red pepper, tahini, olive oil, garlic, lemon juice, cumin, cayenne pepper, smoked paprika, and a pinch of salt. Blend until smooth.
  3. Adjust consistency: If the hummus is too thick, add water a tablespoon at a time and blend until you reach your desired consistency.
  4. Taste and season: Taste the hummus and adjust seasoning by adding more salt, lemon juice, or cayenne pepper if you prefer more spice.
  5. Serve: Transfer the hummus to a serving bowl. Drizzle with olive oil and garnish with red pepper flakes and fresh parsley, if desired. Serve with pita bread, chips, or fresh vegetables.

Enjoy your spicy roasted red pepper hummus as a delicious appetizer or snack!