Home Blog Page 812

Marry Me Chicken Tortellini

Marry Me Chicken Tortellini is an irresistible dish that’s sure to win hearts with its rich, creamy sauce and tender, flavorful chicken. This comforting and indulgent meal combines succulent chicken breasts with cheese-filled tortellini, all coated in a luscious, garlic-infused cream sauce. Enhanced with sun-dried tomatoes, fresh spinach, and a sprinkle of Parmesan cheese, this dish offers a delightful blend of flavors and textures. Perfect for a romantic dinner or a special family meal, Marry Me Chicken Tortellini is a guaranteed crowd-pleaser that’s easy to make and even easier to love.

Ingredients

  • 2 tablespoons olive oil
  • 2 boneless, skinless chicken breasts
  • Salt and pepper, to taste
  • 1 teaspoon garlic powder
  • 1 teaspoon Italian seasoning
  • 3 cloves garlic, minced
  • 1/2 cup sun-dried tomatoes, chopped
  • 1 cup chicken broth
  • 1 cup heavy cream
  • 1/2 cup grated Parmesan cheese
  • 1 teaspoon red pepper flakes (optional)
  • 2 cups fresh spinach
  • 1 (20-ounce) package cheese tortellini
  • Fresh basil or parsley, chopped (for garnish)

Instructions

  1. Cook the chicken: Season the chicken breasts with salt, pepper, garlic powder, and Italian seasoning. In a large skillet, heat the olive oil over medium-high heat. Add the chicken breasts and cook for about 5-7 minutes per side, or until golden brown and cooked through. Remove the chicken from the skillet and set aside to rest. Once cooled, slice the chicken into thin strips.
  2. Sauté the garlic and tomatoes: In the same skillet, add the minced garlic and chopped sun-dried tomatoes. Sauté for about 1-2 minutes until fragrant.
  3. Make the sauce: Pour in the chicken broth and heavy cream, stirring to combine. Bring the mixture to a simmer and cook for about 5 minutes until the sauce starts to thicken. Stir in the grated Parmesan cheese and red pepper flakes (if using).
  4. Add the spinach: Add the fresh spinach to the skillet, stirring until it wilts into the sauce.
  5. Cook the tortellini: While the sauce is simmering, cook the tortellini according to the package instructions. Drain and set aside.
  6. Combine the ingredients: Add the sliced chicken and cooked tortellini to the skillet, gently tossing to coat everything in the creamy sauce. Cook for another 2-3 minutes until everything is heated through.
  7. Serve: Transfer the Marry Me Chicken Tortellini to serving plates. Garnish with chopped fresh basil or parsley.

Enjoy your Marry Me Chicken Tortellini as a delicious, romantic meal that brings together rich flavors and creamy textures, perfect for a special occasion or any night you want to impress.
Seared Ahi Tuna Steaks

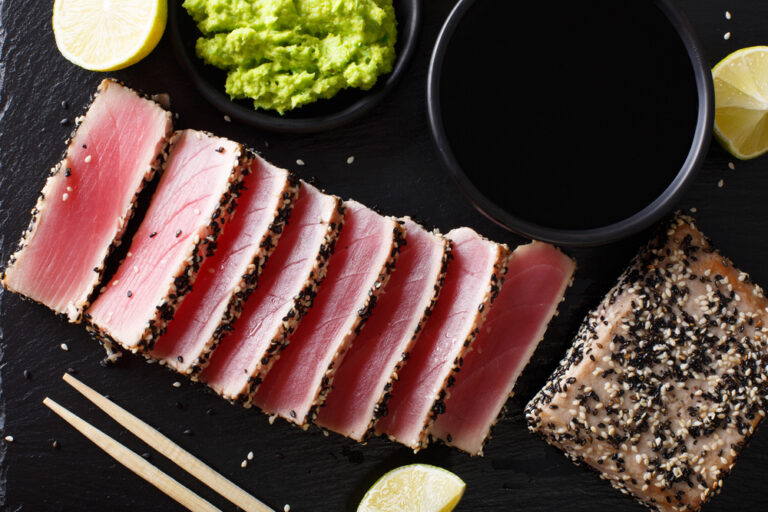
Seared Ahi Tuna Steaks are a culinary delight that brings the taste of the ocean to your plate with minimal effort and maximum flavor. These tuna steaks are quickly seared to perfection, creating a flavorful crust on the outside while keeping the inside tender and rare. This recipe highlights the natural taste of the tuna, complemented by a simple yet elegant marinade and a light sesame crust. Perfect for a quick weeknight dinner or an impressive dinner party dish, Seared Ahi Tuna Steaks are sure to impress with their vibrant presentation and delicious taste.

Ingredients:

  • 2 ahi tuna steaks (about 6 oz each)
  • 2 tablespoons soy sauce
  • 1 tablespoon sesame oil
  • 1 tablespoon rice vinegar
  • 1 tablespoon fresh ginger, grated
  • 1 clove garlic, minced
  • 1/4 cup sesame seeds (white or black, or a mix)
  • 2 tablespoons vegetable oil
  • Salt and pepper to taste
  • Fresh lime wedges (for serving)
  • Optional garnish: sliced green onions, avocado slices, or pickled ginger

Instructions:

  1. Marinate the Tuna:
    • In a small bowl, whisk together the soy sauce, sesame oil, rice vinegar, grated ginger, and minced garlic.
    • Place the tuna steaks in a shallow dish and pour the marinade over them, making sure they are well coated. Marinate for at least 15 minutes and up to 30 minutes.
  2. Prepare the Sesame Crust:
    • Spread the sesame seeds on a plate. Remove the tuna steaks from the marinade, letting the excess drip off, and press them into the sesame seeds, coating both sides evenly.
  3. Sear the Tuna:
    • Heat the vegetable oil in a large skillet over medium-high heat. When the oil is hot, add the tuna steaks.
    • Sear the tuna for about 1-2 minutes on each side, depending on your desired level of doneness. The outside should have a nice crust while the inside remains rare.
  4. Season and Serve:
    • Remove the tuna steaks from the skillet and let them rest for a minute.
    • Slice the tuna steaks into 1/4-inch thick slices and season with salt and pepper to taste.
  5. Garnish and Enjoy:
    • Serve the seared ahi tuna with fresh lime wedges and optional garnishes like sliced green onions, avocado slices, or pickled ginger.

Enjoy your Seared Ahi Tuna Steaks, a quick and elegant dish that brings a taste of gourmet dining to your home!

Sloppy Joe Cornbread Casserole

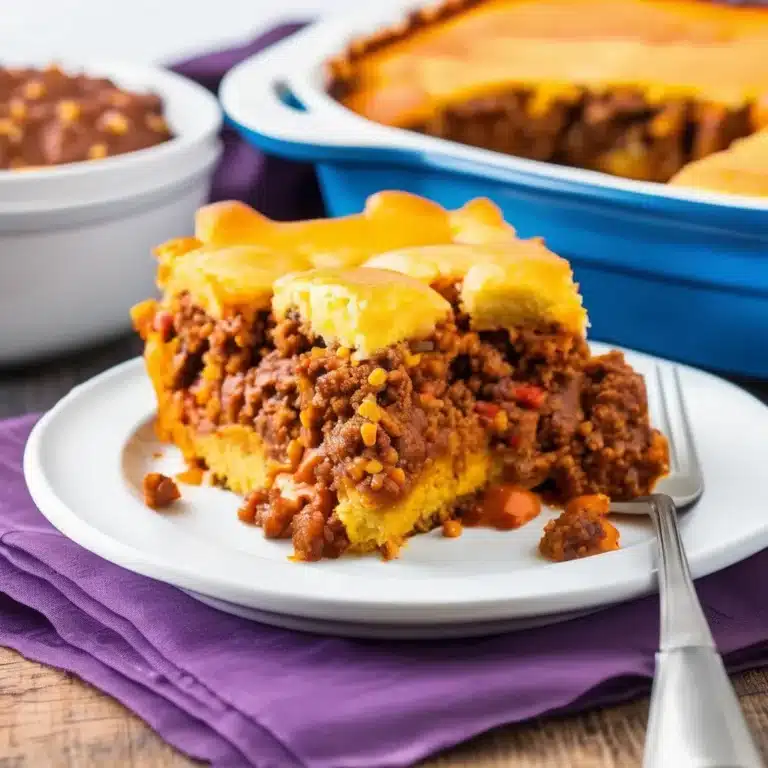
Sloppy Joe Cornbread Casserole is a delightful twist on the classic Sloppy Joe, combining the rich, savory flavors of the beloved sandwich with the comforting, slightly sweet taste of cornbread. This hearty casserole features a layer of homemade Sloppy Joe filling, made with ground beef, tangy tomato sauce, and spices, topped with a golden, fluffy cornbread crust. It’s an easy-to-make, all-in-one meal that’s perfect for busy weeknights or casual gatherings. Serve this satisfying dish with a side salad or steamed vegetables for a complete and delicious dinner that the whole family will love.

Ingredients

For the Sloppy Joe Filling:

  • 1 pound ground beef
  • 1 small onion, finely chopped
  • 1 green bell pepper, finely chopped
  • 2 cloves garlic, minced
  • 1 cup ketchup
  • 1/4 cup tomato paste
  • 2 tablespoons Worcestershire sauce
  • 2 tablespoons brown sugar
  • 1 tablespoon yellow mustard
  • 1 teaspoon chili powder
  • Salt and pepper, to taste

For the Cornbread Topping:

  • 1 cup yellow cornmeal
  • 1 cup all-purpose flour
  • 1/4 cup granulated sugar
  • 1 tablespoon baking powder
  • 1/2 teaspoon salt
  • 1 cup milk
  • 1/4 cup vegetable oil
  • 1 large egg

Instructions

  1. Preheat the oven: Preheat your oven to 400°F (200°C). Grease a 9×13-inch baking dish.
  2. Prepare the Sloppy Joe filling: In a large skillet, cook the ground beef over medium-high heat until browned and cooked through. Drain any excess fat. Add the chopped onion, green bell pepper, and minced garlic to the skillet. Cook for about 5 minutes, until the vegetables are softened.
  3. Add the sauce ingredients: Stir in the ketchup, tomato paste, Worcestershire sauce, brown sugar, yellow mustard, chili powder, salt, and pepper. Reduce the heat to low and let the mixture simmer for 10 minutes, stirring occasionally.
  4. Make the cornbread batter: In a large bowl, whisk together the cornmeal, flour, sugar, baking powder, and salt. In a separate bowl, combine the milk, vegetable oil, and egg. Pour the wet ingredients into the dry ingredients and stir until just combined.
  5. Assemble the casserole: Spread the Sloppy Joe filling evenly in the prepared baking dish. Pour the cornbread batter over the top of the filling, spreading it out evenly with a spatula.
  6. Bake: Place the casserole in the preheated oven and bake for 20-25 minutes, or until the cornbread is golden brown and a toothpick inserted into the center comes out clean.
  7. Serve: Let the casserole cool for a few minutes before serving. Cut into squares and enjoy!

Enjoy your Sloppy Joe Cornbread Casserole as a comforting and flavorful meal that’s sure to become a family favorite, bringing together the best of both worlds in every bite.

Grilled Cheese Sandwich

The Grilled Cheese Sandwich is a timeless classic that epitomizes comfort food at its finest. With its perfectly toasted, golden-brown exterior and melty, gooey cheese interior, this simple yet delicious sandwich is loved by kids and adults alike. The beauty of a grilled cheese lies in its versatility – it can be made with various types of bread and cheeses, and can even be dressed up with additional ingredients like tomatoes, bacon, or herbs. Perfect for a quick lunch, a comforting dinner, or a midnight snack, the Grilled Cheese Sandwich is always a satisfying choice.

Ingredients:

  • 4 slices of bread (sourdough, white, or whole wheat)
  • 4 tablespoons butter, softened
  • 4 slices of cheese (cheddar, American, Swiss, or your favorite)
  • Optional additions: sliced tomatoes, cooked bacon, caramelized onions, or fresh herbs

Instructions:

  1. Prepare the Bread:
    • Spread 1 tablespoon of softened butter on one side of each slice of bread.
  2. Assemble the Sandwich:
    • Place two slices of bread, buttered side down, on a clean cutting board or plate.
    • Top each with 2 slices of cheese. Add any optional ingredients you desire, such as sliced tomatoes or cooked bacon.
    • Place the remaining slices of bread on top, buttered side up, to form the sandwiches.
  3. Heat the Pan:
    • Heat a skillet or griddle over medium heat.
  4. Grill the Sandwiches:
    • Place the assembled sandwiches in the skillet. Cook until the bread is golden brown and crispy, about 3-4 minutes.
    • Carefully flip the sandwiches and cook the other side until golden brown and the cheese is fully melted, another 3-4 minutes.
  5. Serve:
    • Remove the sandwiches from the skillet and let them cool for a minute or two.
    • Slice the sandwiches in half and serve immediately, perhaps with a side of tomato soup or a fresh salad.

Enjoy your Grilled Cheese Sandwich, a warm and cheesy delight that never fails to comfort and satisfy!

Quick and Easy Chicken Noodle Soup

Quick and Easy Chicken Noodle Soup is a comforting and delicious dish that can be made in no time, perfect for those busy weeknights or when you need a bowl of warmth and nourishment. This classic soup features tender chunks of chicken, hearty egg noodles, and a medley of vegetables all simmered in a flavorful broth. The simplicity of this recipe doesn’t compromise on taste, making it a family favorite that’s sure to bring a smile to everyone’s face. Serve it with crusty bread or a fresh salad for a complete and satisfying meal.

Ingredients

  • 1 tablespoon olive oil
  • 1 small onion, finely chopped
  • 2 cloves garlic, minced
  • 3 carrots, peeled and sliced
  • 2 celery stalks, sliced
  • 8 cups chicken broth
  • 2 cups cooked chicken, shredded or diced
  • 1 teaspoon dried thyme
  • 1 teaspoon dried parsley
  • Salt and pepper, to taste
  • 2 cups egg noodles
  • 1/4 cup fresh parsley, chopped (for garnish)

Instructions

  1. Sauté the vegetables: In a large pot or Dutch oven, heat the olive oil over medium heat. Add the chopped onion, and sauté for about 5 minutes until it becomes translucent. Add the minced garlic and cook for another minute until fragrant.
  2. Add the carrots and celery: Stir in the sliced carrots and celery, and cook for another 5 minutes until they start to soften.
  3. Add the broth and chicken: Pour in the chicken broth and bring the mixture to a boil. Add the cooked chicken, dried thyme, dried parsley, salt, and pepper. Reduce the heat to low and let the soup simmer for about 10 minutes to allow the flavors to meld together.
  4. Cook the noodles: Increase the heat to medium-high and add the egg noodles to the pot. Cook for 6-8 minutes, or until the noodles are tender.
  5. Adjust seasoning: Taste the soup and adjust the seasoning with more salt and pepper if needed.
  6. Serve: Ladle the chicken noodle soup into bowls and garnish with chopped fresh parsley.

Enjoy your Quick and Easy Chicken Noodle Soup as a delicious and heartwarming meal that’s perfect for any occasion, providing comfort and nourishment in every spoonful.

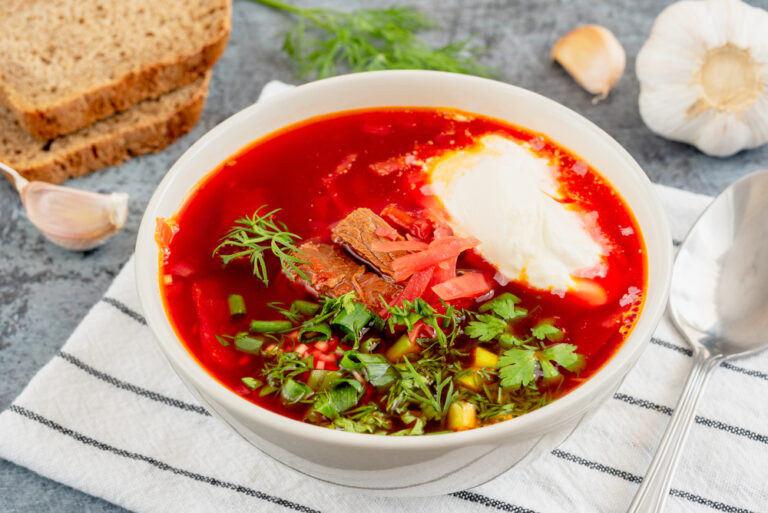
Ukrainian Red Borscht Soup

Ukrainian Red Borscht Soup is a traditional and beloved dish that is both hearty and nutritious. Known for its vibrant red color and rich, complex flavor, this soup is made with a variety of vegetables including beets, cabbage, and potatoes, and is often enriched with tender chunks of beef or pork. The combination of tangy vinegar and sweet beets creates a balanced and satisfying taste that is enhanced by a dollop of sour cream and fresh dill on top. Perfect for cold weather or any time you crave comfort food, this borscht is a true taste of Ukrainian cuisine that will warm your heart and soul.

Ingredients:

  • 1 lb beef or pork, cut into bite-sized pieces
  • 2 tablespoons vegetable oil
  • 1 large onion, finely chopped
  • 2 cloves garlic, minced
  • 2 medium beets, peeled and grated
  • 2 medium carrots, peeled and grated
  • 1 medium potato, peeled and diced
  • 1/4 head of cabbage, shredded
  • 6 cups beef or vegetable broth
  • 2 tablespoons tomato paste
  • 1 tablespoon red wine vinegar
  • 1 bay leaf
  • 1 teaspoon sugar
  • Salt and pepper to taste
  • Fresh dill, chopped (for garnish)
  • Sour cream (for serving)

Instructions:

  1. Prepare the Meat:
    • In a large pot, heat the vegetable oil over medium-high heat. Add the beef or pork pieces and cook until browned on all sides, about 5-7 minutes.
    • Remove the meat from the pot and set aside.
  2. Cook the Vegetables:
    • In the same pot, add the chopped onion and cook until softened, about 5 minutes.
    • Add the minced garlic and cook for another minute until fragrant.
    • Stir in the grated beets and carrots, cooking for about 5 minutes until they start to soften.
  3. Add the Broth and Simmer:
    • Return the browned meat to the pot. Add the diced potato, shredded cabbage, and beef or vegetable broth.
    • Stir in the tomato paste, red wine vinegar, bay leaf, and sugar. Bring the mixture to a boil.
  4. Simmer the Soup:
    • Reduce the heat to low and let the soup simmer for about 45 minutes to 1 hour, or until the vegetables are tender and the flavors have melded together. Season with salt and pepper to taste.
  5. Serve:
    • Remove the bay leaf from the pot. Ladle the borscht into bowls and top each serving with a dollop of sour cream and a sprinkle of fresh dill.

Enjoy your Ukrainian Red Borscht Soup, a delightful and comforting dish that brings the flavors of Eastern Europe to your table!

Ultimate Twice-Baked Potatoes

Ultimate Twice-Baked Potatoes are a decadent and delicious side dish that takes the humble potato to new heights. These potatoes are baked until tender, then scooped out and mixed with a creamy blend of butter, sour cream, cheese, and crispy bacon before being baked again to golden perfection. The result is a rich, flavorful filling with a crispy, cheesy top that will have everyone coming back for seconds. Perfect for special occasions or whenever you want to impress your guests, these twice-baked potatoes are sure to become a favorite addition to your dinner table.

Ingredients

  • 4 large russet potatoes
  • 4 tablespoons olive oil
  • Salt and pepper, to taste
  • 6 slices bacon
  • 1/2 cup sour cream
  • 1/4 cup whole milk
  • 4 tablespoons unsalted butter, softened
  • 1 cup shredded cheddar cheese, divided
  • 1/4 cup chopped green onions
  • 1/4 cup chopped fresh parsley (optional, for garnish)

Instructions

  1. Preheat the oven: Preheat your oven to 400°F (200°C). Line a baking sheet with aluminum foil.
  2. Bake the potatoes: Scrub the potatoes clean and pat them dry. Rub each potato with olive oil and sprinkle with salt. Place the potatoes on the prepared baking sheet and bake for 45-60 minutes, or until they are tender when pierced with a fork.
  3. Cook the bacon: While the potatoes are baking, cook the bacon in a skillet over medium heat until crispy. Remove the bacon from the skillet and place it on a paper towel-lined plate to drain. Once cooled, crumble the bacon and set aside.
  4. Prepare the filling: Once the potatoes are cool enough to handle, cut each potato in half lengthwise. Scoop out the insides, leaving a thin border of potato flesh to support the skin. Place the scooped-out potato flesh in a large bowl.
  5. Mash the potatoes: Add the sour cream, milk, softened butter, 1/2 cup of the shredded cheddar cheese, crumbled bacon (reserve a little for topping), and chopped green onions to the bowl with the potato flesh. Mash everything together until smooth and well combined. Season with salt and pepper to taste.
  6. Stuff the potatoes: Spoon the potato mixture back into the potato skins, mounding it slightly. Place the stuffed potatoes back on the baking sheet.
  7. Bake again: Sprinkle the remaining 1/2 cup of shredded cheddar cheese and reserved bacon on top of the stuffed potatoes. Return the baking sheet to the oven and bake for an additional 15-20 minutes, or until the cheese is melted and bubbly.
  8. Serve: Remove the potatoes from the oven and let them cool for a few minutes. Garnish with chopped fresh parsley, if desired.

Enjoy your Ultimate Twice-Baked Potatoes as a rich and flavorful side dish that’s perfect for any special meal, offering a delightful combination of creamy, cheesy, and crispy textures in every bite.

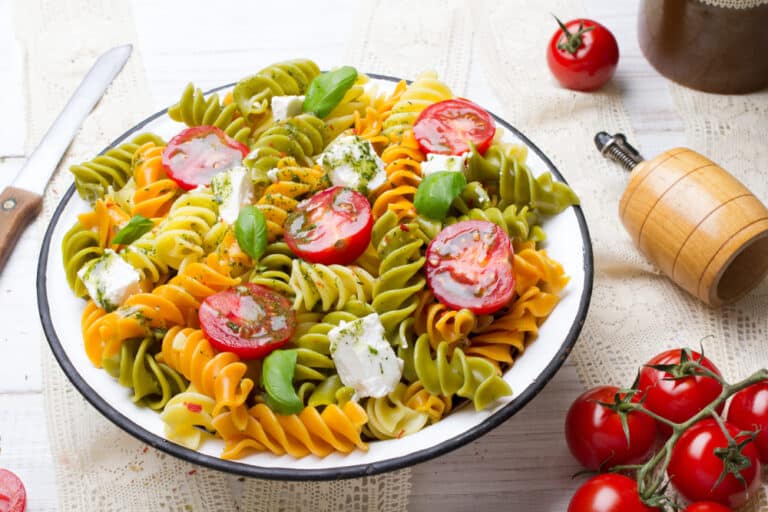
The Ultimate Pasta Salad

The Ultimate Pasta Salad is a vibrant and refreshing dish that’s perfect for picnics, potlucks, or a light lunch. Packed with a colorful medley of fresh vegetables, savory cheeses, and hearty pasta, this salad is tossed in a tangy and herby vinaigrette that ties everything together beautifully. The variety of textures and flavors in this dish make it a crowd-pleaser, appealing to both kids and adults alike. Easy to prepare and highly customizable, this pasta salad can be made ahead of time, allowing the flavors to meld together for an even tastier experience.

Ingredients:

  • For the Salad:
    • 12 oz rotini or bowtie pasta
    • 1 cup cherry tomatoes, halved
    • 1 cup cucumber, diced
    • 1 cup bell peppers (red, yellow, or green), diced
    • 1/2 cup red onion, finely chopped
    • 1/2 cup black olives, sliced
    • 1 cup mozzarella pearls or cubed mozzarella
    • 1/2 cup salami or pepperoni, diced (optional)
    • 1/4 cup fresh parsley, chopped
    • 1/4 cup fresh basil, chopped
  • For the Dressing:
    • 1/4 cup olive oil
    • 3 tablespoons red wine vinegar
    • 1 tablespoon Dijon mustard
    • 1 clove garlic, minced
    • 1 teaspoon dried oregano
    • 1 teaspoon dried basil
    • 1/2 teaspoon sugar
    • Salt and pepper to taste

Instructions:

  1. Cook the Pasta:
    • Bring a large pot of salted water to a boil. Add the pasta and cook according to the package instructions until al dente.
    • Drain the pasta and rinse it under cold water to stop the cooking process. Allow it to cool completely.
  2. Prepare the Dressing:
    • In a small bowl, whisk together the olive oil, red wine vinegar, Dijon mustard, minced garlic, dried oregano, dried basil, sugar, salt, and pepper until well combined.
  3. Assemble the Salad:
    • In a large mixing bowl, combine the cooled pasta, cherry tomatoes, cucumber, bell peppers, red onion, black olives, mozzarella pearls, and diced salami or pepperoni (if using).
    • Pour the dressing over the salad and toss until everything is evenly coated.
  4. Add Fresh Herbs:
    • Gently fold in the chopped fresh parsley and basil.
  5. Chill and Serve:
    • Cover the salad and refrigerate for at least 1 hour before serving to allow the flavors to meld together.
    • Give the salad a good toss before serving and adjust the seasoning if necessary.

Enjoy your Ultimate Pasta Salad, a colorful and flavorful dish that’s perfect for any occasion!

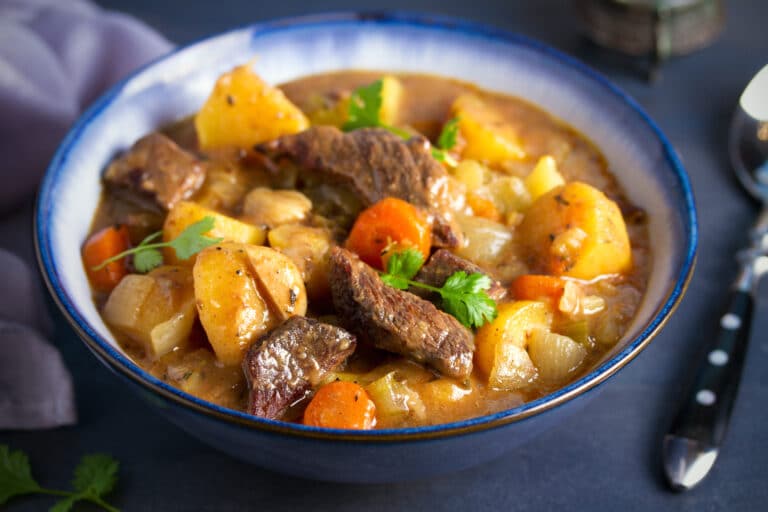
Slow Cooker Beef Stew

Slow Cooker Beef Stew is the ultimate comfort food, perfect for chilly days when you crave something hearty and warm. This classic dish features tender chunks of beef slow-cooked with potatoes, carrots, celery, and onions in a rich, savory broth. The slow cooker allows the flavors to meld together beautifully, creating a deliciously satisfying meal with minimal effort. Ideal for busy weeknights or a cozy weekend dinner, this beef stew is sure to become a family favorite.

Ingredients

  • 2 pounds beef stew meat, cut into bite-sized pieces
  • 3 tablespoons all-purpose flour
  • Salt and pepper, to taste
  • 2 tablespoons olive oil
  • 4 cups beef broth
  • 1 cup red wine (optional)
  • 1 tablespoon Worcestershire sauce
  • 3 cloves garlic, minced
  • 1 large onion, chopped
  • 4 carrots, peeled and sliced
  • 3 celery stalks, sliced
  • 4 potatoes, peeled and diced
  • 1 teaspoon dried thyme
  • 1 teaspoon dried rosemary
  • 2 bay leaves
  • 1 cup frozen peas
  • Fresh parsley, chopped (for garnish)

Instructions

  1. Prepare the beef: In a large bowl, toss the beef stew meat with the flour, salt, and pepper until evenly coated.
  2. Brown the beef: In a large skillet, heat the olive oil over medium-high heat. Add the coated beef in batches and brown on all sides. Transfer the browned beef to the slow cooker.
  3. Deglaze the skillet: If using, pour the red wine into the skillet to deglaze, scraping up any browned bits from the bottom. Pour the deglazed liquid into the slow cooker. (If not using wine, you can deglaze with a bit of beef broth.)
  4. Add the vegetables: Add the chopped onion, carrots, celery, and potatoes to the slow cooker.
  5. Add the broth and seasonings: Pour the beef broth and Worcestershire sauce into the slow cooker. Add the minced garlic, dried thyme, dried rosemary, and bay leaves. Stir to combine.
  6. Cook: Cover the slow cooker and cook on low for 7-8 hours or on high for 4-5 hours, until the beef and vegetables are tender.
  7. Add peas: About 30 minutes before serving, stir in the frozen peas. Cover and cook until heated through.
  8. Serve: Remove the bay leaves and discard. Garnish the stew with chopped fresh parsley before serving.

Enjoy your Slow Cooker Beef Stew as a comforting and hearty meal that’s perfect for warming up on a cold day, delivering tender beef and flavorful vegetables in every bite.

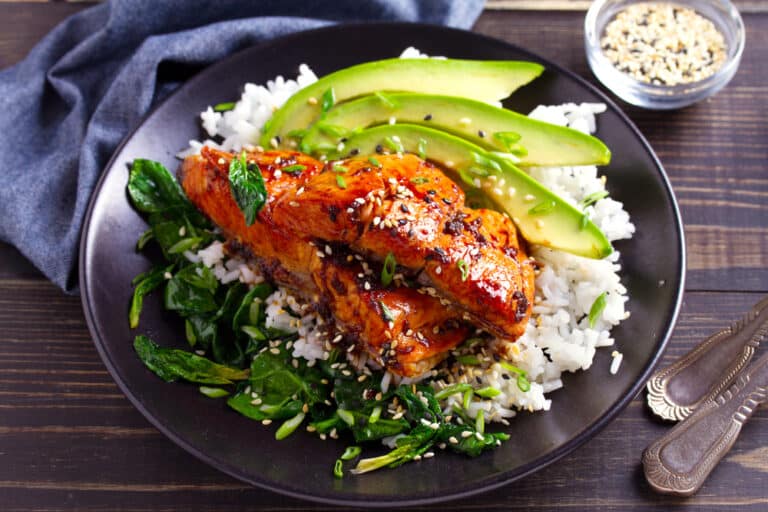
Teriyaki Salmon Bowl

The Teriyaki Salmon Bowl is a vibrant and healthy meal that combines the rich flavors of teriyaki-glazed salmon with a variety of fresh vegetables and rice. This dish offers a perfect balance of sweet and savory, with tender, flaky salmon fillets coated in a homemade teriyaki sauce that is both easy to make and full of flavor. Paired with steamed rice and colorful vegetables, this bowl not only looks beautiful but also provides a nutritious and satisfying meal. Whether you’re preparing dinner for the family or a quick lunch for yourself, this Teriyaki Salmon Bowl is sure to impress with its simplicity and delicious taste.

Ingredients:

  • For the Teriyaki Sauce:
    • 1/4 cup soy sauce
    • 1/4 cup mirin (Japanese sweet rice wine)
    • 2 tablespoons honey or brown sugar
    • 1 tablespoon rice vinegar
    • 2 cloves garlic, minced
    • 1 teaspoon grated ginger
    • 1 tablespoon cornstarch mixed with 2 tablespoons water (slurry)
  • For the Salmon Bowl:
    • 4 salmon fillets (about 6 oz each)
    • 1 tablespoon vegetable oil
    • Salt and pepper to taste
    • 2 cups cooked white or brown rice
    • 1 cup edamame (shelled)
    • 1 cucumber, sliced
    • 1 carrot, julienned
    • 1 avocado, sliced
    • 2 green onions, sliced
    • Sesame seeds (for garnish)

Instructions:

  1. Make the Teriyaki Sauce:
    • In a small saucepan, combine the soy sauce, mirin, honey (or brown sugar), rice vinegar, minced garlic, and grated ginger.
    • Bring the mixture to a simmer over medium heat. Stir in the cornstarch slurry and cook until the sauce thickens, about 2-3 minutes. Remove from heat and set aside.
  2. Prepare the Salmon:
    • Season the salmon fillets with salt and pepper on both sides.
    • Heat the vegetable oil in a large skillet over medium-high heat. Add the salmon fillets, skin-side down, and cook for about 4-5 minutes until the skin is crispy.
    • Flip the salmon and cook for another 3-4 minutes until the salmon is cooked through and flakes easily with a fork.
    • Brush the salmon with the teriyaki sauce during the last minute of cooking.
  3. Assemble the Bowls:
    • Divide the cooked rice among four bowls.
    • Arrange the edamame, cucumber slices, julienned carrot, and avocado slices around the rice.
    • Place a teriyaki-glazed salmon fillet on top of each bowl.
  4. Garnish and Serve:
    • Drizzle any remaining teriyaki sauce over the bowls.
    • Sprinkle with sliced green onions and sesame seeds.

Enjoy your Teriyaki Salmon Bowl, a delicious and healthy meal that’s perfect for any occasion!