Home Blog Page 7

Skillet Chicken Fajitas

0

Skillet Chicken Fajitas are a quick, flavorful, and satisfying dish that brings the vibrant tastes of Tex-Mex cuisine to your table in no time. Tender strips of chicken are seasoned with a smoky blend of spices and cooked to perfection alongside bell peppers and onions, creating a delicious filling for warm tortillas. The sizzling skillet method locks in all the flavors and textures, making every bite irresistible. These fajitas are perfect for a family dinner or casual gathering, allowing everyone to customize their tortillas with toppings like guacamole, salsa, and sour cream for a fresh, fun, and flavorful meal.

Ingredients

  • 1 1/2 lbs boneless, skinless chicken breasts, sliced into thin strips
  • 2 tbsp olive oil, divided
  • 1 red bell pepper, thinly sliced
  • 1 yellow bell pepper, thinly sliced
  • 1 green bell pepper, thinly sliced
  • 1 large onion, thinly sliced
  • 2 tsp chili powder
  • 1 tsp cumin
  • 1 tsp smoked paprika
  • 1/2 tsp garlic powder
  • 1/2 tsp onion powder
  • 1/2 tsp salt
  • 1/4 tsp black pepper
  • Juice of 1 lime
  • Warm tortillas for serving
  • Toppings: guacamole, salsa, sour cream, chopped cilantro, shredded cheese (optional)

Instructions

  1. Prepare the seasoning: In a small bowl, mix together the chili powder, cumin, smoked paprika, garlic powder, onion powder, salt, and black pepper.
  2. Cook the chicken: Heat 1 tablespoon of olive oil in a large skillet over medium-high heat. Add the chicken strips and sprinkle with half of the seasoning mix. Cook for 5-7 minutes, stirring occasionally, until the chicken is browned and cooked through. Remove the chicken from the skillet and set aside.
  3. Sauté the vegetables: In the same skillet, heat the remaining 1 tablespoon of olive oil. Add the sliced bell peppers and onions, and sprinkle with the remaining seasoning mix. Cook for 5-6 minutes, stirring occasionally, until the vegetables are tender and slightly charred.
  4. Combine and finish: Return the cooked chicken to the skillet with the vegetables, and stir to combine. Squeeze the juice of 1 lime over the mixture and toss to coat.
  5. Serve: Serve the chicken and vegetables in warm tortillas and let everyone add their favorite toppings, like guacamole, salsa, sour cream, cilantro, and shredded cheese.

These Skillet Chicken Fajitas are full of smoky, vibrant flavors and make for an easy, fun, and customizable meal that’s perfect for sharing with family and friends!


Malted Chocolate Chip Cookies

0

Malted Chocolate Chip Cookies are a delicious twist on the classic cookie, with a rich and creamy flavor thanks to the addition of malted milk powder. This secret ingredient gives the cookies an extra layer of sweetness and a slightly nutty, caramel-like taste that pairs perfectly with gooey chocolate chips. The result is a soft, chewy cookie with a slight crisp around the edges and a depth of flavor that elevates it beyond your usual chocolate chip cookie. Perfect for cookie lovers who want to try something a little different, these cookies are a real treat with a glass of milk or a cup of coffee.

Ingredients

  • 2 1/4 cups all-purpose flour
  • 1/2 cup malted milk powder
  • 1 tsp baking soda
  • 1/2 tsp salt
  • 1 cup unsalted butter, softened
  • 3/4 cup granulated sugar
  • 3/4 cup brown sugar, packed
  • 2 large eggs
  • 2 tsp vanilla extract
  • 2 cups semi-sweet chocolate chips
  • 1/2 cup milk chocolate chips (optional for extra chocolatey goodness)

Instructions

  1. Preheat the oven: Preheat your oven to 350°F (175°C). Line a baking sheet with parchment paper.
  2. Mix the dry ingredients: In a medium bowl, whisk together the flour, malted milk powder, baking soda, and salt. Set aside.
  3. Cream the butter and sugars: In a large bowl, beat the softened butter, granulated sugar, and brown sugar together until light and fluffy, about 2-3 minutes. Add the eggs one at a time, mixing well after each addition, then stir in the vanilla extract.
  4. Combine the wet and dry ingredients: Gradually add the dry ingredients to the wet ingredients, mixing until just combined. Fold in the semi-sweet and milk chocolate chips.
  5. Form the cookies: Drop rounded tablespoons of dough onto the prepared baking sheet, spacing them about 2 inches apart.
  6. Bake: Bake for 10-12 minutes, or until the edges are golden and the centers are still slightly soft. For a chewier texture, avoid overbaking.
  7. Cool and serve: Allow the cookies to cool on the baking sheet for a few minutes before transferring them to a wire rack to cool completely.

These Malted Chocolate Chip Cookies are a delightful upgrade from the traditional recipe, with their creamy, malty flavor and pockets of melted chocolate, making them an irresistible treat for any occasion!

Ginger Snaps

0

Ginger Snaps are classic, spiced cookies that are perfectly crisp on the outside with a warm and slightly chewy center. Infused with the flavors of ginger, cinnamon, cloves, and molasses, these cookies are a delightful treat that pairs wonderfully with a cup of tea or coffee. Their distinct snap and rich aroma make them an ideal choice for the holiday season, but they’re delicious all year round. Easy to make and bursting with cozy spices, Ginger Snaps are a nostalgic cookie that offers a wonderful balance of sweetness and spice in every bite.

Ingredients

  • 2 cups all-purpose flour
  • 1 tsp baking soda
  • 1/2 tsp baking powder
  • 2 tsp ground ginger
  • 1 tsp ground cinnamon
  • 1/4 tsp ground cloves
  • 1/4 tsp salt
  • 3/4 cup unsalted butter, softened
  • 1 cup granulated sugar (plus extra for rolling)
  • 1/4 cup molasses
  • 1 large egg
  • 1 tsp vanilla extract

Instructions

  1. Preheat the oven: Preheat your oven to 350°F (175°C). Line a baking sheet with parchment paper or lightly grease it.
  2. Mix the dry ingredients: In a medium bowl, whisk together the flour, baking soda, baking powder, ginger, cinnamon, cloves, and salt. Set aside.
  3. Cream the butter and sugar: In a large bowl, beat the softened butter and 1 cup of granulated sugar together until light and fluffy, about 2-3 minutes. Add the molasses, egg, and vanilla extract, and beat until well combined.
  4. Combine the wet and dry ingredients: Gradually add the dry ingredients to the wet ingredients, mixing until a dough forms.
  5. Form the cookies: Roll the dough into 1-inch balls and then roll each ball in granulated sugar. Place the dough balls on the prepared baking sheet about 2 inches apart.
  6. Bake: Bake for 10-12 minutes, or until the edges are set and the tops have a cracked appearance. For a crispier cookie, bake an additional 1-2 minutes.
  7. Cool and serve: Allow the Ginger Snaps to cool on the baking sheet for a few minutes before transferring them to a wire rack to cool completely.

These Ginger Snaps are wonderfully spiced and have the perfect balance of sweetness and warmth, making them an irresistible treat that’s perfect for dunking or sharing!

Zuccotto

0

Zuccotto is an elegant, dome-shaped Italian dessert that combines layers of sponge cake with rich, creamy fillings, making it a delightful and indulgent treat. Traditionally made with liqueur-soaked cake and filled with a mixture of whipped cream, chocolate, and nuts, Zuccotto is a show-stopping dessert that is both light and decadent. The beautiful, dome-like shape is created by lining a bowl with cake and filling it with luscious cream, then chilling it to perfection. Whether served at a special occasion or as an impressive dinner party finale, Zuccotto brings a touch of Italian flair to any table.

Ingredients

For the cake:

  • 1 large sponge cake or pound cake (store-bought or homemade), sliced thinly
  • 1/4 cup rum, brandy, or amaretto (optional)
  • 1/4 cup brewed coffee or espresso

For the filling:

  • 1 1/2 cups heavy cream
  • 1/4 cup powdered sugar
  • 1 tsp vanilla extract
  • 1/2 cup dark chocolate, melted and cooled
  • 1/2 cup chopped toasted hazelnuts or almonds
  • 1/2 cup candied fruit or chocolate chips (optional)

For assembly:

  • Cocoa powder or powdered sugar for dusting
  • Additional whipped cream for serving (optional)

Instructions

  1. Prepare the cake: Line a medium-sized bowl (about 7 inches in diameter) with plastic wrap, leaving some overhang for easy removal later. Arrange the thin slices of sponge or pound cake around the inside of the bowl, pressing gently to form the dome shape. Brush the cake slices with the mixture of rum (or your preferred liqueur) and coffee.
  2. Make the filling: In a large bowl, whip the heavy cream, powdered sugar, and vanilla extract until soft peaks form. Divide the whipped cream into two portions. To one portion, gently fold in the melted chocolate and chopped nuts. The other portion can be left plain or mixed with candied fruit or chocolate chips.
  3. Assemble the Zuccotto: Spread the chocolate-nut cream mixture over the cake layer inside the bowl, forming an even layer. Then add the plain whipped cream on top, filling the rest of the dome.
  4. Seal and chill: Cover the cream filling with more slices of cake to seal the bottom. Fold the overhanging plastic wrap over the top and refrigerate the Zuccotto for at least 4 hours, or overnight.
  5. Unmold and serve: Carefully invert the bowl onto a serving plate and remove the plastic wrap. Dust the Zuccotto with cocoa powder or powdered sugar for a decorative touch. Slice and serve with extra whipped cream if desired.

Zuccotto is a beautiful and indulgent dessert, with layers of soft cake and rich, creamy filling, offering a delightful combination of textures and flavors that’s perfect for any special occasion.

Shredded Pork Tacos

0

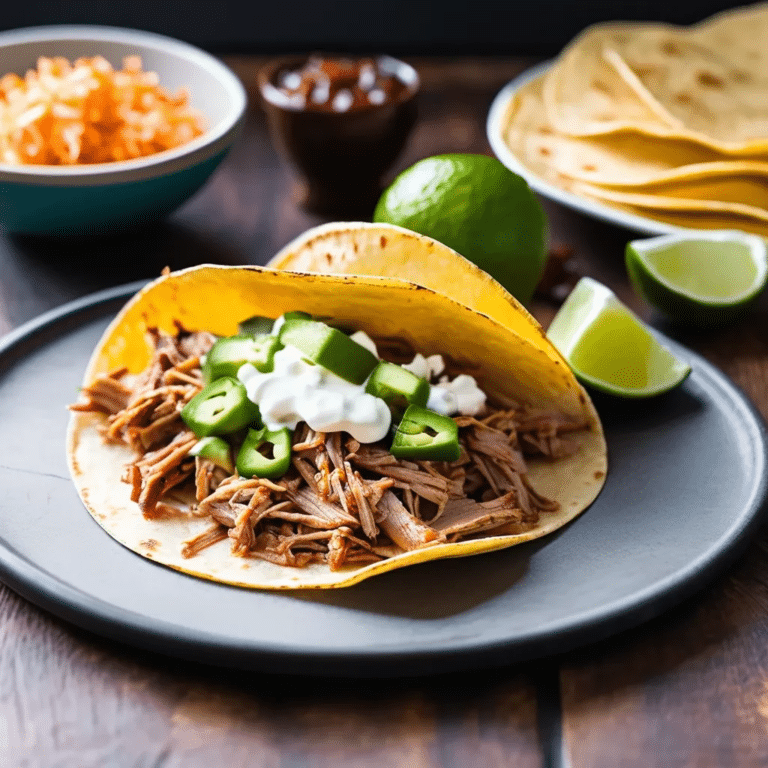
Shredded Pork Tacos are a flavorful, tender, and juicy option for taco night, offering a delicious combination of slow-cooked pork with bold spices and vibrant toppings. The pork is cooked low and slow, allowing it to become melt-in-your-mouth tender and easy to shred. Packed with flavors like cumin, garlic, and chili powder, this versatile filling pairs perfectly with soft tortillas and fresh toppings like cilantro, onions, and salsa. Whether you’re hosting a taco party or making a family dinner, Shredded Pork Tacos are sure to be a hit with their rich, savory taste.

Ingredients

For the shredded pork:

  • 3 lbs pork shoulder (or pork butt)
  • 1 tbsp olive oil
  • 1 onion, chopped
  • 4 cloves garlic, minced
  • 1 tbsp ground cumin
  • 1 tsp chili powder
  • 1 tsp smoked paprika
  • 1 tsp oregano
  • Salt and pepper to taste
  • 1 cup chicken broth
  • 1/4 cup orange juice (optional for extra flavor)
  • Juice of 1 lime

For the tacos:

  • Corn or flour tortillas
  • Fresh cilantro, chopped
  • Diced onions
  • Salsa or pico de gallo
  • Lime wedges for serving

Instructions

  1. Prepare the pork: In a large skillet or Dutch oven, heat the olive oil over medium heat. Season the pork shoulder generously with salt, pepper, cumin, chili powder, smoked paprika, and oregano. Sear the pork on all sides until browned, about 3-4 minutes per side.
  2. Slow cook the pork: Transfer the pork to a slow cooker or an oven-safe pot. Add the chopped onion, garlic, chicken broth, orange juice (if using), and lime juice. Cook on low for 6-8 hours (or in the oven at 300°F/150°C for 3-4 hours), until the pork is tender and easily shredded with a fork.
  3. Shred the pork: Remove the pork from the cooking liquid and shred it with two forks. Return the shredded pork to the pot and toss it in the flavorful juices.
  4. Assemble the tacos: Warm the tortillas and fill each with shredded pork. Top with fresh cilantro, diced onions, salsa or pico de gallo, and a squeeze of lime.
  5. Serve: Serve the tacos immediately with extra lime wedges on the side.

These Shredded Pork Tacos are packed with rich, smoky flavors and are easy to make, making them a perfect choice for any taco night or casual gathering!

Queso Fundido

0

Queso Fundido is a rich, cheesy Mexican dish that’s perfect for parties, gatherings, or simply as an indulgent appetizer. Made with melted cheese and often combined with chorizo, roasted peppers, or mushrooms, this dip is served piping hot and bubbling. Queso Fundido is typically enjoyed with warm tortillas or tortilla chips for dipping, making it a crowd-pleaser that’s full of flavor and comfort. The combination of melted cheese and savory toppings creates a satisfying dish that’s perfect for sharing, offering the ultimate in cheesy goodness.

Ingredients

  • 8 oz chorizo (or substitute with mushrooms for a vegetarian version)
  • 1 small onion, finely chopped
  • 1 clove garlic, minced
  • 1 jalapeño, finely chopped (optional for extra heat)
  • 2 cups shredded Mexican cheese blend (or a mix of Monterey Jack, Oaxaca, and cheddar)
  • 1/4 cup roasted poblano or bell peppers, diced (optional)
  • Warm tortillas or tortilla chips for serving
  • Fresh cilantro for garnish (optional)

Instructions

  1. Cook the chorizo: In a skillet over medium heat, cook the chorizo, breaking it up with a spoon, until fully cooked and browned. Remove the chorizo with a slotted spoon and set aside, leaving some of the rendered fat in the skillet.
  2. Sauté the vegetables: In the same skillet, add the onion, garlic, and jalapeño (if using), and sauté for 3-4 minutes until softened and fragrant. Add the roasted peppers and cook for another minute.
  3. Melt the cheese: Reduce the heat to low and evenly spread the shredded cheese over the sautéed vegetables. Let the cheese melt slowly, stirring occasionally to combine everything.
  4. Add the chorizo: Once the cheese is fully melted and bubbly, return the cooked chorizo to the skillet and stir gently to incorporate.
  5. Serve: Garnish with fresh cilantro if desired and serve immediately with warm tortillas or tortilla chips for dipping.

Queso Fundido is the ultimate gooey, cheesy dip with a smoky, savory twist, perfect for sharing with friends and family at your next gathering!

Garlic Parmesan Green Beans

0

Garlic Parmesan Green Beans are a quick and delicious side dish that elevates the humble green bean to a whole new level. Crisp-tender green beans are sautéed with fragrant garlic and tossed with savory Parmesan cheese, creating a flavorful dish that’s both simple and satisfying. This recipe is perfect for weeknight dinners, holiday meals, or whenever you need a tasty and nutritious accompaniment to your main course. The combination of garlic and Parmesan brings out the natural sweetness of the green beans, making them a crowd-pleaser for all ages.

Ingredients:

  • 1 lb fresh green beans, trimmed
  • 2 tbsp olive oil
  • 3 cloves garlic, minced
  • 1/4 cup grated Parmesan cheese
  • Salt and pepper, to taste
  • 1 tbsp lemon juice (optional)
  • 1/4 tsp red pepper flakes (optional, for a bit of heat)

Instructions:

  1. Blanch the Green Beans: Bring a large pot of salted water to a boil. Add the green beans and cook for 3-4 minutes, until they are bright green and just tender. Drain the beans and immediately transfer them to a bowl of ice water to stop the cooking process. Drain again and set aside.
  2. Sauté the Garlic: In a large skillet, heat the olive oil over medium heat. Add the minced garlic and red pepper flakes (if using), and sauté for about 1 minute, until the garlic is fragrant and golden, being careful not to burn it.
  3. Cook the Green Beans: Add the blanched green beans to the skillet and toss to coat them in the garlic oil. Cook for another 3-4 minutes, stirring occasionally, until the green beans are heated through and have absorbed the garlic flavor.
  4. Add the Parmesan: Remove the skillet from the heat and sprinkle the Parmesan cheese over the green beans. Toss to combine, allowing the cheese to melt slightly and coat the beans.
  5. Season and Serve: Season with salt, pepper, and a squeeze of lemon juice if desired. Serve the Garlic Parmesan Green Beans hot as a side dish to your favorite main course.

These Garlic Parmesan Green Beans are a delicious and versatile addition to any meal, offering a burst of flavor with minimal effort. Enjoy them alongside roasted meats, pasta dishes, or as part of a holiday feast.

Butternut Squash And Lentil Soup

0

Butternut Squash and Lentil Soup is a warm and comforting dish that’s perfect for the cooler months. This hearty soup combines the natural sweetness of butternut squash with the earthy, protein-packed goodness of lentils, creating a rich and nourishing meal. The addition of spices like cumin and coriander enhances the flavors, making this soup both satisfying and fragrant. It’s easy to prepare and can be made in large batches, making it ideal for meal prep or feeding a crowd. Serve it with a slice of crusty bread for a complete and wholesome meal.

Ingredients:

  • 1 medium butternut squash, peeled, seeded, and diced
  • 1 cup dried lentils (red or green), rinsed
  • 1 onion, finely chopped
  • 3 cloves garlic, minced
  • 2 carrots, sliced
  • 2 celery stalks, sliced
  • 6 cups vegetable broth
  • 1 tsp ground cumin
  • 1 tsp ground coriander
  • 1/2 tsp ground turmeric
  • 1/4 tsp cayenne pepper (optional, for heat)
  • Salt and pepper, to taste
  • 2 tbsp olive oil
  • Fresh parsley or cilantro, chopped (for garnish)
  • Lemon wedges (for serving)

Instructions:

  1. Sauté the Vegetables: In a large pot, heat the olive oil over medium heat. Add the chopped onion, garlic, carrots, and celery. Sauté for about 5 minutes, until the vegetables are softened and the onion is translucent.
  2. Add the Spices: Stir in the cumin, coriander, turmeric, and cayenne pepper (if using). Cook for another minute until the spices are fragrant.
  3. Add the Squash and Lentils: Add the diced butternut squash and rinsed lentils to the pot. Stir to coat the squash and lentils with the spices.
  4. Simmer the Soup: Pour in the vegetable broth and bring the mixture to a boil. Once boiling, reduce the heat to low, cover, and let the soup simmer for 25-30 minutes, or until the lentils and squash are tender.
  5. Blend (Optional): For a creamier texture, you can use an immersion blender to blend part of the soup, or transfer a portion to a blender and puree until smooth. Return the blended soup to the pot and stir to combine.
  6. Season and Serve: Taste and adjust the seasoning with salt and pepper as needed. Serve the soup hot, garnished with fresh parsley or cilantro and a squeeze of lemon juice.

Butternut Squash and Lentil Soup is a nourishing and flavorful dish that’s perfect for any time of the year. Its comforting warmth and rich texture make it a go-to recipe for those looking for a healthy, satisfying meal.

Bbq Pulled Pork Sandwiches

0

BBQ Pulled Pork Sandwiches are the epitome of comfort food, combining tender, slow-cooked pork with a smoky, tangy barbecue sauce, all piled high on a soft, toasted bun. The pork is seasoned to perfection, slow-cooked until it’s melt-in-your-mouth tender, and then shredded and mixed with rich barbecue sauce. This sandwich is perfect for gatherings, game days, or any time you’re craving something hearty and satisfying. Serve with coleslaw on top or on the side for the perfect balance of flavors and textures.

Ingredients:

  • 3-4 lbs pork shoulder (or pork butt)
  • 1 onion, finely chopped
  • 4 cloves garlic, minced
  • 1 tbsp paprika
  • 1 tbsp brown sugar
  • 1 tsp ground cumin
  • 1 tsp chili powder
  • 1 tsp salt
  • 1/2 tsp black pepper
  • 1 cup barbecue sauce (plus extra for serving)
  • 1/2 cup apple cider vinegar
  • 1/2 cup chicken broth
  • 8 sandwich buns
  • Coleslaw (optional, for topping)

Instructions:

  1. Prepare the Pork: In a small bowl, mix together the paprika, brown sugar, cumin, chili powder, salt, and pepper. Rub this spice mixture all over the pork shoulder, ensuring it’s evenly coated.
  2. Slow Cook the Pork: Place the chopped onion and minced garlic at the bottom of a slow cooker. Place the seasoned pork on top. Pour the apple cider vinegar and chicken broth around the pork. Cover and cook on low for 8-10 hours or on high for 4-5 hours, until the pork is tender and easily shreds with a fork.
  3. Shred the Pork: Once the pork is done, remove it from the slow cooker and shred it using two forks. Discard any excess fat. Return the shredded pork to the slow cooker and stir in the barbecue sauce. Let it cook for an additional 30 minutes to absorb the flavors.
  4. Prepare the Sandwiches: Toast the sandwich buns if desired. Pile the pulled pork onto the buns and drizzle with extra barbecue sauce. Top with coleslaw if using.
  5. Serve: Serve the BBQ Pulled Pork Sandwiches hot with your favorite sides like chips, pickles, or a fresh salad.

These BBQ Pulled Pork Sandwiches are sure to be a hit, offering a perfect combination of savory, smoky flavors with a hint of sweetness. Whether enjoyed at a casual get-together or a weekend dinner, they are sure to satisfy everyone at the table.

Mango Kulfi

0

Mango Kulfi is a luscious, creamy Indian dessert that’s perfect for cooling down on a hot day. This frozen treat combines the exotic flavor of ripe mangoes with the richness of condensed milk, infused with hints of cardamom for a touch of warmth. Unlike traditional ice cream, kulfi has a dense, velvety texture that melts slowly in your mouth, allowing you to savor its vibrant flavors. Easy to make and incredibly refreshing, Mango Kulfi is a delightful way to enjoy the tropical sweetness of mangoes in a classic dessert.

Ingredients:

  • 2 ripe mangoes, peeled and pureed (about 1 1/2 cups of puree)
  • 1 can (14 oz) sweetened condensed milk
  • 1 cup heavy cream
  • 1/2 cup whole milk
  • 1/4 tsp ground cardamom
  • A handful of chopped pistachios or almonds (optional, for garnish)

Instructions:

  1. Prepare the Mango Puree: Peel the mangoes, remove the flesh, and puree it in a blender or food processor until smooth. Set aside.
  2. Mix the Kulfi Base: In a large mixing bowl, combine the sweetened condensed milk, heavy cream, whole milk, and ground cardamom. Whisk until well combined and smooth.
  3. Add the Mango Puree: Stir the mango puree into the milk mixture, blending thoroughly to ensure the mixture is evenly combined.
  4. Pour and Freeze: Pour the mixture into kulfi molds, small cups, or popsicle molds. If using cups, cover them with aluminum foil and insert a wooden stick in the center. Freeze the kulfi for at least 6-8 hours, or until fully set.
  5. Serve: To unmold the kulfi, briefly run the molds under warm water. Garnish with chopped pistachios or almonds if desired, and serve immediately.

Mango Kulfi is a rich and flavorful dessert that brings the taste of Indian tradition to your home. Its creamy texture and vibrant mango flavor make it an irresistible treat for any occasion.